Seed and Grain Sourdough Loaf
Servings: 20 slices
Calories: 222kcal
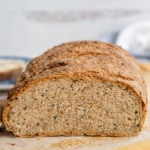
This Seed and Grain Sourdough Loaf is a hearty, rustic bread flecked with whole grains and seeds like oats, flaxseeds, chia seeds, and quinoa that's exceptional for eating on its own or building a sandwich. Prep time includes a 12-hour inactive soaking period.
Print Recipe
Equipment
- 4-quart (or larger) stand mixer
- heavy skillet
- clean razor blade or lame
Ingredients
For the Soaker
- 1/4 cup (40 grams) quinoa
- 1/3 cup (30 grams) old-fashioned rolled oats
- 1/3 cup (40 grams) sunflower seeds
- 1/4 cup (40 grams) golden flax seeds
- 4 1/2 tablespoons (15 grams) chia seeds
- 2 tablespoons (15 grams) sesame seeds white, black, or combination, toasted
- 1 cup (160 grams) whole wheat flour
- 1 teaspoon (6 grams) kosher salt
- 1 cup (250 milliliters) warm water (110°F/43°C)
Sourdough Sponge
- 1/2 cup (140 grams) sourdough starter
- 1 1/2 cups (190 grams) bread flour
- 1/2 cup (125 milliliters) warm water (110°F/43°C)
For the Bread Dough
- 2 1/4 teaspoons (7 grams) active dry yeast
- 1 tablespoon (15 grams) warm water (110°F/43°C), plus more as needed
- 1 teaspoon (5 grams) honey or sugar
- soaker
- sourdough sponge
- 1/2-1 cup (80-160 grams) whole wheat flour
- 1 teaspoon (6 grams) kosher salt
- bread flour as needed for kneading and forming the loaf
Instructions
Feed and Bring Your Sourdough Starter to Room Temperature
- If you haven't fed your sourdough starter in more than a week, feed it using the instructions found in this post before using it in this recipe.Allow the starter to come to room temperature (72°F/ if you have fed it recently.
Soak the Quinoa
- Begin by adding the quinoa to a 2-quart bowl and covering it with water. Microwave the quinoa-water mixture on high for 5 minutes.
- Remove the bowl from the microwave and use a spoon to stir the quinoa and water together again. Allow the quinoa to soak for 10 minutes before draining off the water, rinsing the quinoa in cold water, and allowing the grain to cool completely.
Mix the Soaker
- Add the chia seeds, golden flaxseeds, rolled oats, sesame seeds, sunflower seeds, and salt to the bowl with the quinoa. Next, add the whole wheat flour and the warm, filtered water to the bowl.
- Use a spoon or rubber spatula to stir the ingredients in the bowl until combined.Cover the bowl with a clean kitchen towel or plastic wrap and allow the soaker to rest overnight or for at least 12 hours.
Mix the Biga (Starter)- Begin Right After Finishing the Soaker
- In a 3-quart bowl, use your hands to stir together the sourdough starter, bread flour, and warm, filtered water until it forms a dough. Knead the biga by pulling it back and forth between your hands for 2 to 3 minutes or until it begins to pull back when you stretch it. The dough will be pretty sticky, but try not to add any additional flour to it.
- After the dough starts to retract, put it back into the mixing bowl. Cover the bowl with a clean kitchen towel or plastic film and allow it to ferment for 12 hours or overnight.
Prepare the Final Bread Dough
- Stir the active dry yeast into the warm, filtered water along with the honey. After 5 minutes of soaking, the yeast should bubble and move the water. This indicates that your yeast is alive and will leaven the bread.
- Break up the soaker and biga/starter into 4 or 5 clumps. Add them to a stand mixer's bowl along with the yeast mixture, 1/2 cup (80 grams) of the whole wheat flour, and, finally, the salt.
- Begin blending these ingredients together on 1st speed (or low speed) using the dough hook attachment. The dough will begin to stretch and appear scraggly as it mixes. Once the dough looks cohesive, increase the mixer speed to 3rd speed (or medium-low). Knead the mixture for 4 to 5 minutes.
- Add half to all of the remaining whole wheat flour if the mixture doesn't come together and form a ball or climb up the dough hook. If your dough looks really dry and slams against the sides of the bowl, add 1 to 2 tablespoons of extra warm water to hydrate it again, adding more water as needed to loosen the dough to a soft, supple, tacky dough.
Allow the Dough to Rise
- After kneading the dough for 4 or 5 minutes, turn it onto a lightly floured surface. I recommend using bread flour for this step because whole wheat flour dries out the dough faster. Knead the slightly sticky dough on the floured surface for four to five minutes, only adding as much flour to the counter as needed to keep the dough from sticking too much.
- After kneading the dough, cover it with the kitchen towel and allow it to rest for 5 minutes while you prepare the mixing bowl. Spray or brush your mixing bowl with canola or olive oil spray. Knead the dough for one more minute before adding it to the greased bowl.
- Flip the dough over in the bowl so the greased bottom becomes the top. Cover the bowl with a kitchen towel or plastic film. Put the bowl in a warm area of the kitchen and allow it to rise for 1 hour or until doubled in bulk.
Form the Dough and Give It a Second Rise
- After an hour, carefully scrape the dough onto a lightly floured surface. Gently form the dough into a loaf shape and transfer it to a lightly floured, parchment-lined sheetpan. The goal is to leave the gasses that have built up in the dough where they are at. Try not to manipulate it too much at this point.
- Spray or gently brush a light layer of canola or olive oil onto the surface of the formed dough. Loosely cover the loaf with a kitchen towel and allow it to rise in a warm area of your kitchen for 30 to 45 minutes.
Prepare Your Oven for Baking
- While the bread rises a second time, prepare to create a steam bath in the oven by placing a skillet (heavy-gauged steel or cast iron) on the bottom rack of your oven. Place the rack you'll bake the bread on in the middle position of the oven. If you have a baking stone or tiles, begin preheating it in the oven now.
- Preheat your oven to 500°F (260°C).
Bake the Seed and Grain Sourdough Loaf
- Set 1 1/2 cups (375 milliliters) of very hot water (heated in the microwave) near the oven.After your loaf has doubled in bulk, use a lame or a clean razor blade to slash the surface of the dough to keep your bread from bursting open as it bakes.
- Slide the sheetpan into the preheated oven or use a rimless sheetpan or peel to transfer it to the baking stone. Quickly pour the hot water into your steam pan and close the door. Try to be as quick as possible to avoid dropping the oven temperature too much.
- Decrease the oven's temperature to 450°F (232°C) and bake the bread loaf for 20 minutes. Rotate the pan or loaf of bread 180° and bake for 20 to 25 minutes.Remove the loaf of bread from the oven when it is a nutty brown color and sounds hollow when thumped.
Glaze the Baked Loaf While Hot (Optional)
- Brush a layer of cold water onto the bread immediately after removing it from the oven. Allow the seed and grain sourdough bread to cool for at least 30 minutes to allow the crumb to set up inside.
- Serve this seed and grain sourdough bread on its own, toasted and spread with butter or jam, or use it to make your favorite sandwiches.
Notes
Swaps and Substitutions:
- Switch the seeds or grains you use in the recipe to include more of what you like and less of what you don't. Be sure to weigh your ingredients if you choose to switch them up to maintain the proper balance in the dough:
- Amaranth (replaces the quinoa).
- Barley (replaces the quinoa).
- Hemp Seeds (replace the chia or sesame seeds).
- Millett (replaces the quinoa).
- Pumpkin Seeds (replace the sunflower seeds).
- Teff (replaces the quinoa).
To Mix the Dough By Hand:
- Combine the soaker, starter, yeast mixture, 1/2 cup (80 grams) whole wheat flour, and salt together in a 4-quart mixing bowl with your hand or a stiff spoon.
- Once the dough comes together in the bowl, transfer it to a floured surface.
- Knead the dough for a total of 10 minutes.
- Add extra flour as needed to keep it from sticking to the countertop.
- Proceed from"Allow the Dough to Rise" step above.
Tips and Techniques:
- Soaking quinoa (or any grain) separately softens it and removes acids in the grain, making the quinoa more digestible and palatable in the final bread loaf.
- I recommend using filtered water since tap water contains contaminants and chlorine by-products that can alter the flavor of your bread.
- If you don't see any movement in the yeast mixture after 5 minutes of blooming, your yeast is dead, and you'll need to start over with a fresh jar or packet.
- Baking stones need at least 45 minutes to heat properly. If you're using one to bake the bread on preheat it with the oven.
- Brushing or misting your baked bread with water is a cheap way to give it a glossier finish. This isn't a must, but it makes for a prettier loaf.
- Use a sharp, serrated bread knife to cut the bread and maintain its structure and appearance.
- This recipe makes a loaf that produces anywhere from 16 to 24 slices, depending on how thick or thin you cut your bread.
Storage Instructions:
- To store seed and grain sourdough bread:
- Wrap the cooled loaf in a layer of plastic wrap before storing it in an airtight container or bag.
- Don't slice the entire loaf of bread if you can help it. Intact bread dries out slower than sliced bread does.
- Avoid storing your bread in the refrigerator, as the cold air makes it stale faster.
Freezing Instructions:
- To freeze the baked seed and grain sourdough loaf:
- Wrap the cooled loaf well in plastic wrap, then wrap it in a layer of heavy-duty aluminum foil.
- Freeze the bread for 2 months or less.
- To thaw the bread, set it on the countertop, still wrapped, and thaw it for 12 hours or overnight.
Nutrition
Calories: 222kcal | Carbohydrates: 35g | Protein: 8g | Fat: 6g | Saturated Fat: 1g | Polyunsaturated Fat: 3g | Monounsaturated Fat: 2g | Trans Fat: 0.004g | Sodium: 195mg | Potassium: 188mg | Fiber: 6g | Sugar: 1g | Vitamin A: 6IU | Vitamin C: 0.1mg | Calcium: 59mg | Iron: 2mg