Buttermilk biscuits are a quick bread recipe of two types of flour, butter, and a chemical leavener brought together with buttermilk. And making them from scratch isn’t beyond your baking skills. These beauts are resplendent in all of their buttery glory. The mounds of love are easy to make, so long as you know the technique needed to help them bake up to their full potential.

What is Buttermilk?
Buttermilk is usually made from fresh skim milk. “Cultured Buttermilk” refers to the bacteria or a culture that sours the milk. This differentiates prepared buttermilk from the liquid that remains after churning butter.
The chemistry behind baking with buttermilk is something I’ve always geeked out over. The conversion of the lactose (milk sugar) in buttermilk to lactic acid is what makes it different from plain milk. The acidity in the buttermilk needs to be neutralized in order for your baked goods to not taste like crap. To do this, baking soda needs to be added to the dough in addition to baking powder, which is the main leavener. If you don’t add the baking soda, the biscuits will taste very chemically and acrid. The benefit of the lactic acid in buttermilk, though, is that helps weaken the gluten in the flour, which contributes to a tender biscuit.
What’s the Best Flour for Making Biscuits?
Popular [Southern] opinion is that all “good” biscuits must be made with White Lily flour. And … yeah, that’s a hard “no” from me. First of all, you can’t even buy White Lily everywhere in this country. So, if not everyone in the country can get their hands on a sack of White Lily, you mean to tell me all those folks have been making bad biscuits?!? No. I have only been able to bake with White Lily flour once and I couldn’t spot the difference it made in my baked biscuits. Sure, it was good flour, but it also costs a bit more money than the most expensive flour on the shelf.
A combination of all-purpose flour and cake flour makes the lightest, fluffiest buttermilk biscuits.
What do I Need to Make Buttermilk Biscuits?

To make buttermilk biscuits you need all-purpose flour, cake flour, cold unsalted butter, sugar, salt, baking powder, baking soda, and buttermilk.
Using two low-protein flours like all-purpose and cake flour means the biscuits bake up tender and fluffy.
You will need a round biscuit cutter, a sheet pan, a pastry brush, and some more melted salted (or unsalted) butter for brushing on the baked biscuits later.
Can I Just Use One Type of Flour?

First, as with most of my baked goods, this recipe will begin by our mixing the dry ingredients together in a large mixing bowl.
Sift to combine the flours, the baking powder and soda, sugar, and salt together in the bowl. Sifting the dry ingredients aerates them, which helps contribute to the light and fluffy quality we’re aiming for in the finished biscuits.
You can make buttermilk biscuits with just all-purpose flour if you don’t have cake flour.
Why Do I Need to Use Cold Ingredients to Make Buttermilk Biscuits?

The water in the cold butter evaporates quickly in the hot oven, which creates pockets in the buttermilk biscuits. It’s important to keep the butter in the biscuit dough as cold as possible because the pockets left behind when the water in the butter evaporates appears as layers of flakiness in the final product. I often put the butter in the refrigerator or freezer while I’m measuring out the rest of my ingredients.
Take the very cold unsalted butter and use a cheese grater to grate it into the flour mixture.
After shredding the butter into the flour mixture, use your hands to crumble the two together. Shredding the butter cuts down on the time it takes to cut it into the flour, which means our dough won’t grow too warm. The mixture should resemble a coarse cornmeal when you’ve finished.
What if I Don’t Have Buttermilk?
To make buttermilk at home:
- Measure out 1 1/2 cups (375 milliliters) of skim milk.
- Stir 1 1/2 tablespoons (22 milliliters) of white vinegar or fresh lemon juice into the milk.
- Leave the mixture to sit until the milk has curdled, about 15 minutes.
This quantity makes just enough buttermilk for this buttermilk biscuit recipe. For use in other recipes, use 1 cup (250 milliliters) of skim milk to 1 tablespoon of white vinegar or lemon juice.
How Far Ahead Can I Make the Biscuit Dough?

Now that the butter and flour have been combined, add the very cold buttermilk to the bowl.
Use your hands to lightly toss the mixture together. Mix just until the flour is absorbed and a scraggly dough forms.

Since the more we handle the dough, the more gluten we will form, be mindful not to over mix the dough. Just knead it enough to incorporate all of that loose flour.
How Do I Create Layers in My Buttermilk Biscuits?

The key to achieving layers in your baked biscuits is creating layers in the dough itself. Folding the dough over 2 or 3 times creates layers of dough and fat which means more layers in the final biscuit.
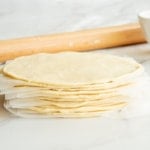
Use a rolling pin to roll the dough out into an 10″x6″ rectangle. Fold the dough like you would fold a letter and roll it out once more to the same size as earlier. Fold it one last time.
Roll the dough out again into a rough 10″x 6″ rectangle. The dough should be about 3/4″ to 1 inch thick. After you fold the dough, cover the bowl and let it rest in the fridge for 15-30 minutes. This gives the biscuit dough time to hydrate and the gluten strands a chance to relax. You can skip this step, but your biscuit dough might shrink back when you roll it out.
You can prepare buttermilk biscuit dough 2 days ahead of when you plan to bake them. Make sure to wrap the dough well in plastic wrap to keep it from drying out. Making the biscuit dough ahead is actually a great thing, since it ensures your dough is very cold and hydrated.
How Do I Avoid Flat Biscuits?

If you want the fluffiest biscuits ever, you may want to forgo the circle cutter altogether. Since circle cutters leave scraps, I recommend using your sharpest knife to cut the biscuit dough into triangles or squares. Done this way, you’ll get anywhere from a baker’s dozen (13) to 16 biscuits.
Since my life’s mission is your viewing pleasure- and because people have such visceral reactions to biscuits that aren’t round- I’m going the circular route. My circle cutter is 3 inches in diameter, so I’m barely going to eke out 12 biscuits.
Pressing and twisting the biscuit cutter seals the layers of biscuit dough together. Instead, press your well-floured cutter straight down and pull it straight up from the dough while cutting.
Can I Re-roll the Biscuit Dough?

Because my goal is to use up as much of my biscuit dough as possible, I re-roll my scraps. You should only re-roll biscuit dough once, and very lightly.
Press the scraps together, but don’t knead them again. Just run the rolling pin over them, pressing down slightly, to seal them together. Cut out however many more biscuits you can get from these scraps. This is the max that you want to re-roll your scraps. Any more than two rolls and you may end up with hockey pucks instead of biscuits. For me, I can’t throw away an ounce of dough without feeling guilty, so I press any remaining scraps of dough into my cutter.
Transfer each of the discs of dough to a sheet pan lined with parchment paper or a silicone baking mat. If you prefer biscuits that stand straight up, position them a 1/2″ apart on the sheet pan prior to baking. Being able to use each other’s sides as they bake helps them stand straighter.

For buttermilk biscuits that bake up as evenly as possible, use your knuckle to press a dimple into the center of each biscuit top. The dimple prevents a bulge from forming on top of the biscuits as they bake.
How Long Do Biscuits Need to Bake?

Pop your pan of biscuits into an oven preheated to 400°F. Bake the biscuits for 15-20 minutes in a 400°F (204°C) oven. I’m a fan of biscuits that have some color so I go for a full 20 minutes.
While your biscuits are baking, slowly melt a 4 tablespoons of butter over medium-low heat.
Once the biscuits are done baking, pull the pan from the oven and use a pastry brush to brush the melted butter over each top. Brushing the butter over the biscuits while they are hot from the oven seals more buttery flavor into them, while at the same time keeping them soft.
How Do I Serve Buttermilk Biscuits?

Buttermilk biscuits can be served anytime of day and at any meal. Serve them with fruit preserves and butter for breakfast. You can also serve them at brunch or at dinner.
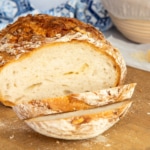
I never serve my Guinness Beef Stew without a pile of biscuits to go with it.
How Do I Store Leftover Buttermilk Biscuits?

Store buttermilk biscuits at room temperature in an air-tight container for 2 to 3 days.
You can also freeze the pre-baked, cut circles of dough, or the baked biscuits, as well. Just freeze the biscuits on a lined sheet pan (allow baked biscuits to cool completely first) before transferring the biscuits to a freezer storage bag. Freeze the biscuits for 2 months (unbaked) or up to 6 months (baked).
Allow the unbaked biscuit dough to thaw on a sheet pan in the fridge for 2 hours before baking as instructed. Biscuits that were baked prior to being frozen are ready to eat right after thawing.
Be sure to pin and share this post for your biscuit baking needs and share it with your friends!

Buttermilk Biscuits
at Sense & EdibilityEquipment
- 3-inch round cookie or biscuit cutter
- pastry brush
Ingredients
- 2 cups (260 grams) all-purpose flour
- 2 cups (250 grams) cake flour
- 2 tablespoons (25 grams) granulated sugar
- 4 teaspoons (15 grams) baking powder
- 1 1/2 teaspoons (9 grams) kosher salt
- 1 teaspoon (6 grams) baking soda
- 2 sticks (226 grams) unsalted butter very cold
- 1 1/2 cups (375 milliters) buttermilk very cold
- 1/4 cup (57 grams) unsalted butter melted, for brushing the baked biscuits
Instructions
- Preheat your oven to 400°F (204°C). Line a sheet pan with parchment paper or a silicone baking mat.
Prepare the Buttermilk Biscuit Dough
- Combine, then sift, the all-purpose flour, cake flour, baking powder, sugar, salt, and baking soda into a large mixing bowl.Grate the cold butter into the flour mixture. Use your fingers to toss the butter into the dry ingredients to create a coarse, cornmeal-like mixture.
- Pour the cold buttermilk into the mixture and gently fold everything together just until the dough comes together. Try not to overwork the dough.
Roll the Biscuits
- Press the biscuit dough into a rectangular shape, then fold the dough in thirds- letter-style-and use a rolling pin to roll the dough out again into a rectangle.
- Fold the dough again and roll it back out one more time before folding it a third (and final) time. Wrap the dough and allow it to rest in the fridge for 30 minutes. This resting time isn't mandatory, but it will keep the dough from shrinking back when you go to roll it out a final time.
- Roll the dough out until it is 3/4"-1" thick. The rectangle should be approximately 10" x 6".Press a floured, round biscuit cutter straight down and pull straight up into the dough to cut out rounds. Don't twist the biscuit cutter or you'll seal the dough, which will prevent the biscuit from rising fully. Cut the biscuits as close together as possible to get the most out of this first roll.
- Gather any scraps of dough and press them firmly together until they stick to one another. Lightly roll the dough out to 1" thick and recut.Arrange the biscuits on the prepared sheet pan.
Bake the Buttermilk Biscuits
- Make a dimple in the top of each biscuit with your knuckle or fingertip. This creates an even surface in the baked biscuit which will prevent the center from bulging up.
- Bake the biscuits for 15-20 minutes, depending on how dark you like your biscuits. As soon as you remove the baked biscuits from of the oven, brush them lightly with the melted butter.
Notes
Swaps and Substitutions:
- You can make buttermilk biscuits with just all-purpose flour if you don't have cake flour.
- Replace the melted salted butter with unsalted butter for a lower sodium buttermilk biscuit.
- Use whole milk instead of buttermilk if you don't have any.
Tips and Techniques:
- To make buttermilk at home:
- Measure out 1 1/2 cups (375 milliliters) of skim milk.
- Add 1 1/2 tablespoons (23 milliliters) of white distilled vinegar or fresh lemon juice to the milk and stir to combine.
- Allow the mixture to sit for 15 minutes, or until the milk is curdled.
- You can prepare buttermilk biscuit dough 2 days ahead of when you plan to bake them. Make sure to wrap the dough well in plastic wrap to keep it from drying out.
- You can use a very sharp knife to cut triangles or squares of dough instead of using a circular cutter.
- For biscuits that stand straight up, position them a 1/2" apart on the sheet pan prior to baking. Being able to use each other's sides as they bake helps them stand straighter.
Storage Instructions:
- Store buttermilk biscuits at room temperature in an air-tight container for 2 to 3 days.
Freezing Instructions:
- To Freeze Unbaked Biscuits:
- Freeze the raw, cut biscuits on a prepared sheet pan until they are frozen solid.
- Transfer the biscuit dough to a freezer storage bag and store for up to 2 months.
- When you're ready to bake, allow the biscuit dough to thaw under refrigeration for 2 hours (or overnight) before baking as instructed.
- To Freeze Baked Biscuits:
- Allow the baked biscuits to cool completely. Freeze the biscuits on the same sheet pan they were baked on.
- When the biscuits are frozen, transfer them to a freezer storage bag. Freeze for up to 6 months.
- Thaw at room temperature before eating.


Just made the Buttermilk Biscuits this morning, so easy and tasty! If my country husband says their good, best believe their good!
I’m so glad you, and the Hubby, enjoyed them, Teri!