Mardi Gras without King Cake just doesn’t sit right. From Twelfth Night to Fat Tuesday, there’s always one on the table—soft, sweet bread twisted with cinnamon sugar and cream cheese, showered in purple, green, and gold. It’s not just dessert, it’s tradition, and everybody’s got an opinion about what makes a good one. This recipe walks you through every step so you can bake a King Cake that takes you to the vibrant streets of New Orleans: rich, festive, and worthy of whoever ends up finding the baby.
I’ve updated this post, published in February 2020, with prettier pictures and more concise instructions. The cream cheese recipe is now made with powdered sugar to reduce the ooze factor.

What’s The Tradition Behind King Cake?
King cake is a sweet bread similar to brioche, filled with cream cheese, cinnamon, or fruit. It’s a much fancier version of cinnamon rolls because it’s more bread than a cake, so it really should be called “King Bread.”
King Cake isn’tjust served for Mardi Gras, also known as Shrove Tuesday or Fat Tuesday. It also isn’t just a Louisiana/Mississippi creation. Latinos serve their version of King Cake for Dia de Los Reyes (or Three King’s Day). The French (and other Europeans) have a version of it called Galette des Rois. However, the French version is more pastry than bread, and it’s typically filled with almond paste.
These countries and cultures have one thing in common when it comes to their King’s Cakes: the time of year when they are served. King cake is served from Epiphany, on January 6th, to the start of the Lenten season, and it’s often what determines who the “king” of Mardi Gras festivities will be. Mardi Gras season precedes Ash Wednesday, which marks the beginning of Lent. Basically, everyone indulges in food, alcohol, and general bon temps (good times) before the holy season begins.
According to tradition, whoever finds the king cake baby hidden in the cake is “King” of the carnival season and is accorded all honors as such. They also have to provide the next king cake the following year.
I don’t hide the plastic baby in my king cake since it’s a choking hazard. I’m also the only royalty in this house, so we don’t need to jockey for anything.
What Ingredients Do I Need For This Recipe?

For this king cake recipe, you need sugar, bread flour, butter (save the wrappers), whole milk, active dry yeast, eggs, salt, and ground cardamom (optional).
My version is a twisted loaf filled with cinnamon sugar and a cream cheese filling! You can make both fillings and have a two-fer King Cake, or just go with one filling. We’ll get to those, as well as the vanilla glaze, later.
Many king cake recipes include a small king cake baby to represent the baby Jesus. The plastic baby is optional. I don’t recommend putting plastic babies in your king cake, as it may pose a choking hazard.
What Is A Sponge?

King Cake is similar to brioche; it begins with a sponge (or starter). The pre-fermentation gives your bread a more complex flavor.
Heat the milk to 110°F (43°C) in a microwave or on the stove. Heat the milk to 110°F (43°C) in a microwave or in a saucepan on the stove. Check the milk temperature and remove it from the microwave or stove once it reaches 105°F to 110°F (40-43°C). Let it cool for 5 minutes if it’s hotter than 110°F (43°C) or until a few drops on the inside of your wrist feel slightly warm. Milk that’s too hot will kill the yeast.
Combine the warm milk, active dry yeast, a portion of the bread flour, and some of the sugar in a large bowl.
Mix the sponge to create a thick paste, then cover the bowl with a clean kitchen towel or a piece of plastic wrap. Put the bowl in a warm place in the kitchen and let it ferment for 30 minutes.
After half an hour, you can continue making the bread or transfer the starter to a jar and refrigerate it for 24 hours. Let it come to room temperature before using it in the king cake dough if you refrigerate it.
How Do I Finish The King Cake Dough?

Add the remaining sugar and room-temperature butter to the bowl of a stand mixer or to a large mixing bowl if you’re using an electric hand mixer. Use the paddle attachment to cream the butter and sugar together at medium speed until light and fluffy, or 6-7 minutes. Scrape down the sides of the bowl and the paddle twice during the creaming process to ensure everything is properly mixed.
Next, add the room-temperature eggs to the mixture and blend them in for 4 minutes at low speed. The egg-butter mixture will resemble curdled cream, which is okay.
Add all the room-temperature sponge you made earlier to the bowl, blending it with the egg-butter mixture until smooth and pancake-batter consistency.
How Long Do I Knead The Dough?

Switch to the dough hook attachment and add the ground cardamom, kosher salt, and 3 cups of the bread flour to the bowl.
Knead the dough on second speed (or by hand) for 2 minutes. Gradually add the remaining cup of bread flour as needed. Humidity will determine if you use all, some, or more than the remaining flour. If the dough is super sticky, add more flour. If you are kneading the dough in the mixer, pay attention to how it is behaving at the bottom of the bowl. A dough that is too wet will cling to the bottom of the bowl rather than wrap around the dough hook. Add more flour if you see this happening. If the dough looks dry or really stiff, however, sprinkle a tablespoon of water in there to moisten it.
It’s better to add too little flour than to overdo it and try to bring it back, so be conservative.
Knead the dough for a total of 10 minutes.
When finished, the dough’s texture will feel supple, soft, and like it wants to stick to your hands but won’t when you release it.
How Long Is The First Rise Time?

Remove the dough from the bowl and use the butter wrappers to grease the bowl. Return the dough to the bowl, then flip it over to grease the surface and prevent skin from forming.
Cover the bowl with a clean towel and let the dough rise in a warm area for one hour. A microwave or an oven (that’s turned off) is a great, draft-free, controlled environment.
Why Is My King Cake Dough Sticky?
The best practice when working with king cake dough is to retard the dough. Your body heat and the heat in the kitchen make the butter in the dough soft, which makes it more difficult to work with.
Retarding is a baking term for slowing down the fermentation and leavening processes. This technique allows the bread to develop a great flavor without continuing to proof (or rise), which could cause it to collapse and bake poorly. The time in the refrigerator also firms the butter in the dough, making it easier to handle in the next step.
To retard the dough, cover the bowl with plastic wrap and refrigerate. Chill it for 3 hours or overnight.
Roll out the dough after it has risen for an hour if you choose not to retard it.
What Is The Most Popular King Cake Filling?

King cakes have a variety of fillings, but the most popular are cinnamon sugar and cream cheese. This king cake recipe includes both cinnamon and cream cheese. You can fill yours with both or just one. If you want only one filling, double its ingredients to make enough to fill your king cake.
I recommend making the fillings while the dough is rising. For the cinnamon-sugar filling, you’ll need brown sugar, cinnamon, and room-temperature unsalted butter.

Beat the brown sugar, cinnamon, and butter for 3-4 minutes on medium-high speed with a hand mixer, until light and fluffy. You can leave the cinnamon-sugar filling on the countertop if you’re making the king cake right after proofing.
Make-Ahead Tip!
You can cover the bowl and refrigerate the cinnamon filling for up to a week. Allow the filling to come to room temperature before using it so it’s soft enough to spread when you’re ready.

For the cream cheese filling, you’ll need cream cheese, lemon zest, powdered sugar, and vanilla extract. You can add the lemon juice from the zested lemon if you wish.

Blend the ingredients together on medium-low speed until smooth.
Keep the cream cheese filling on the countertop if you’re assembling the king cake right away. You can also cover and refrigerate the filling for a week. Remember to allow it time to soften before spreading.
How Do I Assemble A King Cake?

Bring the king cake dough to just a little below room temperature to make it easier to roll out. Just put it on the countertop a half-hour before you want to roll it out.
Use a knife or bench scraper to divide the dough into two equal pieces. Divide the dough even if you’re only making one of the fillings because you’re still going to twist it.
Use a rolling pin to roll out one piece of dough on a lightly floured surface into a 26×16-inch (66x41cm) rectangle. Spread a thin layer of the cinnamon-sugar mixture over the dough’s surface, leaving a 1-inch margin along one long side. Begin rolling the dough loosely on the covered side toward the uncovered margin. The dough needs to be a bit slack so it doesn’t tear when you form it or during its second rise.
Pinch the seam side to the body of the dough to seal it. Roll the log of dough between your hands and the counter to stretch it out to about 30 inches (76cm). Leave the dough resting on the seam and move it over so you can fill the other half.

Roll the remaining dough to the same size and shape. Spread the cream cheese filling evenly on top, leaving a 1-inch (2.5cm) margin on one long end and 1 1/2-inch (4cm) margins on both of the short ends.
The cream cheese oozes more than the cinnamon-sugar because of its consistency, so the margins will help keep things neat.
Roll, pinch, and stretch the same way you did with the first roll. This one will be looser. Try not to puncture the dough, or the filling will ooze out.
How Do I Form A King Cake?

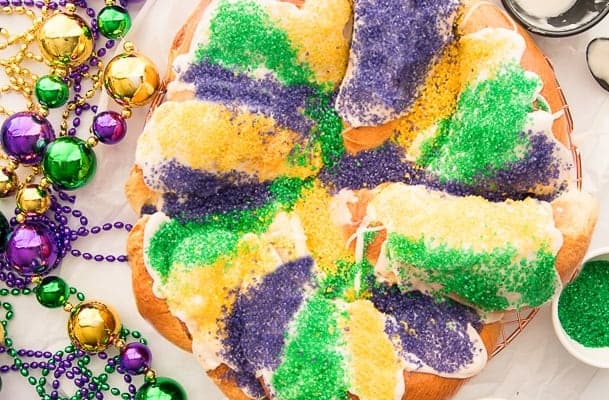
To form the king cake into a ring, lay the two dough logs perpendicular to one another on a silicone baking mat or a sheet of parchment paper. Pinch the ends of the rolls together, then carefully twist the two rolls of dough together until you reach the opposite ends. Form the twisted rope into an oval or a wreath, then transfer it to a sheet pan. Don’t worry about sealing the ends of the circle right now; just overlap them.
Cover the king cake ring with a kitchen towel and let it rise for 30 minutes in a warm area. Heat your oven to 350°F (177°C) while you wait.
Make an egg wash by whisking together a large egg yolk and cold water. Brush a light coating of egg wash where the ends meet and pinch them together to seal the ring after the second rise. Brush the top of the king cake with the remaining egg wash to give it a golden, glossy top after baking. You can use a very sharp knife to cut the cinnamon log open to prevent it from ripping, or just bake it as is. Tearing is usually the result of rolling the log too tightly, but cutting slits into the dough will make it less crazy looking.
Bake the king cake for 30 minutes, turning the baking sheet 180° halfway through baking, until the bread is golden brown and sounds hollow when tapped. Ideally, the internal temperature for the king cake is between 190°F and 195°F (88-91°C) when measured in the thickest part of the cake.
How Do I Make The King Cake Glaze?

King cake glaze is made with powdered sugar, vanilla (or almond extract), light corn syrup (or honey), and warm water or warm milk. You can switch up the flavors of this glaze by using a different extract.
Whisk the light corn syrup, powdered sugar, and vanilla extract together in a small bowl. Thin the glaze to your desired consistency with hot water.
Heat the mixture over low heat until it is runny if you like thin glazes. To make a thick glaze for your king cake, thin it to the consistency of molasses. You can make the glaze a few days in advance and store it, covered, at room temperature.
How Do I Decorate King Cake?

Remove the king cake from the oven and let it cool completely after baking. Carefully transfer the cooled cake to a wire rack (cooling rack).
Pour or spoon the glaze onto the surface of the King Cake. Heat the glaze in the microwave for 30 seconds if it’s too thick for either. You can add more water if you need to thin it further.

The traditional colors of Mardi Gras are purple (justice), green (faith), and gold (power). Decorate the king cake with a generous coating of purple, green, and gold or yellow colored sugar or sprinkles.
You can also use gel colors to tint the glaze purple, green, and gold (or yellow) to decorate your king cake. Or skip the colored sugars or sprinkles and just leave it glazed white.
How Do I Serve It?

If you absolutely must include a little baby, do so after you’ve baked and cooled the cake. Pop it into the cake after cooling and before glazing and decorating. You can just put it under the loaf somewhere, too.
Slice and serve! Mardi Gras King Cake is served for dessert, coffee, or breakfast with a mug of chicory coffee. I prefer Community Coffee since they’re a Louisiana brand. They even have a King Cake Flavor Blend!
How Do I Store Leftovers?

Wrap the king cake tightly in plastic wrap or transfer it to an airtight container and store it at room temperature for up to 3 days. Avoid storing king cake in the refrigerator, as it will stale faster in the cold.
I like to reheat a leftover slice of king cake in the microwave for 15 seconds to give it a just-baked flavor.
Can I Freeze King Cake?

You can freeze an undecorated king cake for up to 2 months.
Cool the king cake completely, then wrap it in two layers of plastic wrap. I also wrap it in a layer of heavy-duty aluminum foil. Freeze the king cake for 2 months.
Thaw the frozen king cake at room temperature, then frost and decorate.

This King Cake is meant to be shared; passed around the table, sliced a little uneven, sugar getting everywhere like it’s supposed to. It’s soft, rich, and full of that old-school Mardi Gras spirit that makes Carnival season feel special year after year. So grab a slice, keep an eye out for the baby, and remember: if you find it, you’re bringing the next cake. That’s just how it goes. Laissez les bons temps rouler.
Don’t forget to let me know what you think of the recipe in the comments, and share this post with your friends and family!
King Cake with Cinnamon and Cream Cheese Filling
at Sense & EdibilityEquipment
- stand mixer or hand mixer
- pastry brush
- rolling pin
Ingredients
For the Enriched Bread Dough
- 1 cup (250 milliliters) whole milk warmed to 110°F (43°C)
- 4 1/4 teaspoons (16 grams or 2 packets) active dry yeast
- 6-6 1/2 cups (800-845 grams) bread flour separated
- 1 cup (226 grams) unsalted butter room temperature (save the wrappers)
- 1/2 cup (115 grams) granulated sugar plus 1 tablespoon
- 3 large eggs room temperature
- 1 teaspoon (2 grams) ground cardamom optional
- 1/2 teaspoon (3 grams) kosher salt
Cinnamon-Sugar Filling
- 1 cup (240 grams), packed brown sugar
- 1/2 cup (113 grams) unsalted butter room temperature
- 1 tablespoon (6 grams) ground cinnamon
Cream Cheese Filling
- 8 ounces (226 grams) cream cheese room temperature
- 1/4 cup (60 grams) powdered sugar sifted
- 1 teaspoon lemon zest from 1/2 a large lemon
- 1 teaspoon vanilla extract
Egg Wash
- 1 egg yolk
- 1 tablespoon water
Vanilla Glaze
- 3 cups powdered sugar sifted
- 3 tablespoons (62 grams) light corn syrup or honey
- 1 teaspoon vanilla extract
- 2 tablespoons (30 milliliters) unsalted butter melted (optional)
- hot water as needed to thin
Optional Garnishes
- sprinkles
- colored sanding sugar
- chocolate shavings
- plastic baby or dried bean
Instructions
Mix the Sponge
- Place the bowl in a warm, draft-free area in the kitchen for 30 minutes. The sponge will begin fermenting and rising during this period.After 30 minutes, you can continue with the making of the bread or transfer the starter to a jar and refrigerate it for 24 hours*.
Make the Bread Dough
- Add the remaining sugar and the butter to the bowl of your stand mixer (fitted with the paddle attachment) or to a large mixing bowl if you're using an electric hand mixer. Cream the butter and sugar together until light and fluffy on medium speed (#3 on a KitchenAid) or for 4 1/2 minutes. Scrape down the bowl and the paddle twice during the creaming process to ensure the mixture is creamed evenly.
- Add all of the eggs to the bowl and blend them into the sugar-butter mixture for 4 minutes at low speed (#1 on a KitchenAid). Scrape down the paddle and bowl twice during this step.The mixture will resemble curdled cream at this point. Add all of the room temperature sponge to the bowl.
- Blend the sponge into the egg-butter mixture on low speed (#1 on a KitchenAid) until the mixture looks smooth and thick, like pancake batter, or for 2 minutes.Scrape down the bowl and paddle, then switch to the dough hook. Add the ground cardamom, kosher salt, and 3 cups of the bread flour to the bowl. Or, if you're kneading by hand, place the 3 cups of flour onto a clean countertop and scrape the dough mixture into the center of the flour.
- Knead the dough on second speed (or with your hands) for 2 minutes. Gradually add the remaining cup to 1 1/2 cups of bread flour as needed. Humidity will determine if you use all, some, or more than the remaining quantity of flour. If the dough is super-sticky, you need to add more flour. If you are kneading the dough in the mixer, pay attention to how it is behaving at the bottom of the bowl. A dough that is too wet will cling to the bottom of the bowl instead of wrapping itself around the dough hook. If yours is doing that, add more flour. On the other hand, if the dough looks dry or really stiff, sprinkle a tablespoon of water in there to moisten it. It's better to add too little flour than to overdo it and try to bring it back, so be conservative. Knead the dough for a total of 10 minutes. When finished, the dough will feel supple, soft, and feel like it wants to stick to your hands but won't when you release it.
Allow the Dough to Rise
- Once the dough is mixed, remove it from the bowl. Grease the bowl using the butter wrappers you saved earlier. Return the dough to the bowl and flip it over. This step oils the surface of the dough and helps prevent skin from forming on its surface.Cover the bowl with a clean towel and allow the dough to rise in a warm, draft-free area of your kitchen for 1 hour.
Retard the Dough for Easier Handling (Optional)
- After the dough has doubled in size, punch down the dough. To retard the dough (see details in post), cover the bowl with plastic wrap and place the bowl in the refrigerator. Chill the dough for 3 hours or overnight to make it firm, and therefore easier, to handle.
Prepare the Cinnamon-Sugar Filling (while the dough is rising or up to a week ahead)
- In a small mixing bowl and using a hand mixer, beat the brown sugar, butter, and cinnamon together on medium-high speed until light and fluffy or 3-4 minutes. If you're assembling the king cake right after it rises, just leave the cinnamon-sugar filling on the countertop. You can also cover the bowl and store the cinnamon-sugar mixture in the fridge for up to a week. It will need to come to room temperature before spreading.
Prepare the Cream Cheese Filling (up to a week ahead)
- Add the cream cheese, sifted powdered sugar, lemon zest, and vanilla extract to a mixing bowl. Blend the ingredients together on med-low speed until smooth. The cream cheese filling will not be super-sweet, so add sugar to your preference. Keep the cream cheese filling on the countertop if you're assembling the king cake right away. If not, cover and refrigerate for a week. Remember to allow it time to soften before spreading.
Assemble the King Cake
- If you have retarded your dough: allow it to warm to slightly colder than room temperature on the countertop. Taking the chill off of it will help it roll out easier. Use a knife or bench scraper to divide the dough into two equal pieces. Using a rolling pin, roll the dough out on a lightly floured surface. A rectangle that measures 26-inches by 16-inches is ideal.
- Spread a thin layer of the cinnamon-sugar mixture onto the dough's surface, leaving a one-inch margin on one of the long sides.Loosely roll the dough, beginning on the covered side, towards the side that has the uncovered margin. Once the log is rolled, pinch the dough's edge to its body of it to seal it. Roll the log between your hands and the counter to stretch it out to about thirty inches. Now, roll the log so the seam is on the bottom and set it out of the way so you can roll the cream cheese log.
- Roll out the second piece of dough to the same specs as the first. Spread the cream cheese filling evenly on top, but this time, leave a 1-inch margin on one long end and 1 1/2-inch margins on both of the short ends.Roll, pinch, and stretch the same way you did with the first roll. This one will feel softer. Pinch the ends of the cream cheese log to prevent the filling from oozing out.
- Place the two dough logs perpendicular to one another on a silicone baking mat or a sheet of parchment paper. Pinch together the ends of the two rolls to join them. Carefully twist the two rolls of dough together until you get to the opposite ends. Form the twisted rope into a wreath and transfer the mat or paper it's on to a sheet pan, overlapping the ends.
- Cover the wreath with a clean kitchen towel and allow it to rise for thirty minutes in a warm area of your kitchen. In the meantime, begin heating your oven to 350°F (177°C).
Make the Egg Wash
- Whisk together the egg yolk and water in a small mixing bowl. After the dough has risen, brush egg wash where the ends meet and pinch them together to seal the ring. Brush the rest of the dough with the egg wash.
Bake the King Cake
- If you see that the dough is beginning to tear, it means your logs were rolled too tightly. You can use a very sharp knife to cut open the top of the cinnamon logs, or just bake it as is. Bake the loaf for 30 minutes or until the bread is golden brown and sounds hollow when tapped. You may have to rotate your pan halfway through baking to ensure it browns evenly.
Make the Vanilla Glaze (up to two days ahead)
- In a mixing bowl, combine the powdered sugar, corn syrup (or honey), vanilla extract, and melted butter if you're using it. Add enough hot water to thin the glaze to your desired consistency.You can make the glaze a few days in advance and store it, covered, at room temperature.If your glaze thickens too much, nuke it in the microwave for 30 seconds. Give it a stir, and it should be fluid. If not, just stir in a few drops of hot water.
Finish the King Cake
- Once the king cake is baked, remove the pan from the oven and allow the bread to cool completely.Spoon the glaze onto the surface of the king cake.
- Decorate with a generous amount of colored sanding sugar or sprinkles.You can also tint the glaze the Mardi Gras colors with gel food color and decorate it that way!
- Serve and enjoy your king cake!
Notes
Storage Instructions:
- Wrap leftover king cake tightly in plastic wrap or transfer it to a sealed food storage container.
- Store at room temperature. Avoid storing the king cake in the fridge because the cold air will make it go stale faster.
- King cake tastes best within 3 days of baking.
- Reheat leftover slices in the microwave for 15 seconds to give them a just-baked flavor.
Freezer Instructions:
- Freeze the king cake before frosting it.
- Allow the cake to cool completely.
- Wrap the cake in a double layer of plastic wrap, followed by a layer of heavy-duty aluminum foil.
- Freeze the cake for up to 2 months.
- Thaw the frozen king cake at room temperature, before frosting and decorating as desired.


I have made this recipe dozens of times, there are no notes to give, it is simply phenomenal!
I have used Meyer lemon zest in the cream cheese, very nice. Never had a reason to freeze, as these are gobbled up in no time, but I imagine it would do very well in the freezer.
I love your notes in the recipe regarding the ability to make filling ahead of time, and slowly adding flour to the sponge while watching for the dough to cling to the hook and leave the bottom of the mixing bowl.
I left my dough to retard a full 24 hrs once, and while the second rise did not look impressive, I just popped in the oven and it rose like the champion that this cake is!!
I am not a baker, except for THIS KING CAKE! This recipe makes anyone a star in the kitchen.
Make this, and ascend as King or Queen of any krewe!!
I love that, Justin! I’m so glad it’s become a part of your celebrations!
This is such a gorgeous recipe! I’ve been making king cakes for about 30 years. I tried yours for the first time this year. The presentation is outstanding.
Reminds me of my mothers sweet dough, it’s very heavy so thinking I’ll cook at 325
This cake is super good! I love the cinnamon-roll flavors. Thanks so much for the great recipe!
Yessss! I love the cinnamon with the cream cheese in this king cake. It’s a classic flavor combo.
I’ve happily made this for the past three years. My husband grew up next to New Orleans and his birthday is January 9th. I almost had a heart attack when he told me he spent almost $100 getting one shipped to us. He now tells me every year mine is better than those of his youth! Thanks for the very thorough directions.
That means the world to me, Deanna! So glad to know it’s bringing your man the comfort of home.
Has anyone tried this recipe with almond flour?
I’ve made it a few times and i love this recipe but i’ve recently had to make some diet changes and I was curious if this could be made with almond flour/what adjustments have to be made to do so
Thanks in advance for any advice anyone can give!!
You can try it but expect it to not have the same chew or rise as high as when you make it normally. I haven’t tested or tried it so please let me know how it turns out.
That’s what i was afraid of 🙁 I will probably do it by the recipe again since it’s for an event, but I plan on playing with it just see soon! I will definitely let you know. Thank you for such an awesome recipe, everyone loves when I make it!!!
I’m so glad to know that, Savannah! I may play it the recipe using almond meal as well.