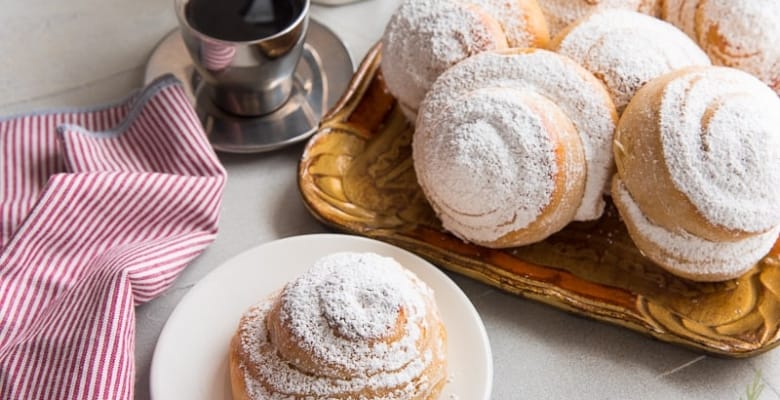
Mallorcas or Pan de Mallorca are Puerto Rican sweet buns dusted with powdered sugar. The soft bread is commonly served in Puerto Rico during breakfast time, but you can eat these fluffy buns any time of the day.
This is a revamp of my Mallorcas recipe, which I first posted in January 2017. The recipe now includes metric measurements and more concise instructions. Enjoy!

What Are Mallorcas?
Mallorcas (also called Pan de Mallorca) are enriched yeast rolls with a taste that’s similar to Hawaiian sweet rolls. They have a flaky, sweet interior with a slightly crusty, sugary exterior. The latter is thanks to their being slathered with a sugar glaze and dusted with powdered sugar. I’m no anthropologist, but I’m going to go out on a limb and say they’re a holdover from the island’s Spanish colonizers, especially since there’s a Spanish Island of Mallorca. The Philippines and the Canary Islands also have versions of this bread called Ensaïmada.
Pan de Mallorca is easily identified by its signature coil, slightly rounded bun shape, and powdery white coating. Mallorcas make a fantastic sandwich bread and this happens to be the best mallorca bread recipe this side of San Juan.
What Ingredients Do I Need To Make Mallorcas?

The ingredients for this sweet bread are pretty accessible. You will need room temperature unsalted butter, all-purpose flour, eggs, sugar, yeast, and a wee bit of salt. To top the finished rolls, you’re going to make a sugar glaze using light corn syrup, sugar, and water. More sugar- in the form of powdered sugar- will come later.
A few tools you will need are: a rolling pin, a sharp knife or a pizza cutter, sheet pan, pastry brush, and a sifter.
How Do I Make The Dough?
In order to give your mallorcas a deeper, more unique flavor, you need to start with a sponge.
Scald, then cool, a cup of whole milk in a saucepan. You can also heat the milk in the microwave for 1 minute. Test the milk after it’s been cooled a little to make sure it’s not too hot. You want lukewarm milk, which is around 110°F. Warm enough not to burn your inner wrist when you put a drop on it.
In a large bowl combine the active dry yeast, a pinch of the granulated sugar, and 2 cups (260 grams) of the flour, once the milk has cooled a bit.

Use a rubber spatula to stir these together to form a thick paste.
Cover the bowl with a clean kitchen cloth and allow this yeast mixture to rise until doubled in a warm place free of drafts. This usually takes an hour.
Can I Make Them Gluten-Free?
To convert a traditional mallorcas recipe to gluten-free, swap the all-purpose flour with gluten-free bread flour. The added wheat starch in gluten-free bread flour (not all-purpose) will give you a similar texture to traditional all-purpose flour.
What Purpose Does The Sponge In Mallorcas Serve?

When you make mallorcas with a sponge, the yeast has time to activate without having to compete with too many other ingredients or processes. As a result, you get a higher rise and deeper flavor in your mallorca bread.
After 45 minutes, begin creaming together your butter and sugar. I prefer to do this in the mixing bowl of my stand mixer. Cream the two together on medium-high speed for 4 minutes, or until the mixture looks pale yellow and fluffy.
Decrease the speed to low and add the eggs to the bowl, one at a time. Once an egg is incorporated into the mix, turn the mixer off and scrape down the bowl. Continue adding the eggs until they’re all mixed in. Since we’re creating an imbalance between the water and fat with the eggs, the mixture may look curdled. Don’t freak out!
Add the sponge from earlier and half of the remaining flour to the bowl. Blend on low speed just until a thick dough forms.
Switch to the dough hook attachment and add the rest of the flour to the bowl. Knead the dough for 5 minutes on second speed. The bread dough will be soft and slightly sticky when you’re finished kneading it.
How Long Do I Chill The Dough?

Transfer the dough to a lightly greased sheet pan. Use the butter wrapper to lightly grease the sheet pan. Since the dough might feel slightly sticky, so you need to grease the pan to keep it from sticking too much.
Use a rubber spatula or your hands to spread the dough into an even layer on the sheet pan. Cover the dough with plastic wrap and chill it in the fridge for at least 1 hour. You can chill the pan de mallorca dough for up to 24 hours and make them the next day, too. The longer you allow the dough to retard in the refrigerator, the more firm it will be and the deeper the natural flavor of the yeast will become. I strongly recommend chilling the dough because it makes working with it less frustrating.
Can I Freeze Mallorca Dough Before Baking It?
You can freeze mallorcas dough, after you mix, it for up to 2 months. Spread it onto a sheetpan, cover it well with plastic wrap, and freeze it just like that.
When you’re ready to make the bread, you need to thaw it in the fridge overnight. It may also add an additional 30-45 minutes of warming time once it has thawed. That’s just because it will be extra-cold coming out of the fridge.
How Do I Form The Dough?

After the dough has had a chance to firm up, lightly flour a clean work surface and roll the dough into a rectangle that is about 18″ (46cm)x 12″(30cm) or thereabouts. The dough should be no more than a 1/4″ (.5 cm) thick.
Use a pastry wheel, a pizza wheel, or a very sharp knife to cut the rectangle into 1 1/4″ (3cm) wide strips. I don’t go overboard with measuring these strips, I just eyeball it. You do want to make sure you get 12 strips, because that means you will have 12 mallorcas! I usually discard those ragged edges you see on the left and right sides, too. Trimming the dough like this is purely aesthetic, so don’t stress over it.
To form the mallorcas, start at one end of a long strip and roll it up into spiral buns. Kind of like you would do to make a cinnamon rolls only sideways.
Once I have my rolled dough circle-thing, I spread the layers open a little- like a flower- to give it a prettier appearance and place them on a baking sheet pan lined with parchment paper or a silicone baking mat.
The concept is the same as a cinnamon roll. However, you don’t roll the rectangle up like a cinnamon roll and cut it is because you want to keep that snail-shaped bun as sharp as possible. Slicing would smoosh the layers together and eliminate those lines of demarcation.
How Long Does The Dough Need To Rise?

Cover the rolls of mallorcas with a clean kitchen towel and set the pan in a warm, draft-free environment. Your microwave is great for this if the pan fits. Give the mallorcas dough a second rise for 45 minutes to 1 hour.
Once the rolls have puffed up (they may or may not spread while proofing), brush them with a thin layer of the egg wash- an egg mixture of water and egg yolks
Bake your mallorcas for 20-25 minutes at 350°F, or until they are a light brown color and sound hollow when thumped. The buns will rise in the oven and the layers may separate. This just means your dough is flaky like it should be.
Is The Glaze A Must?

Mallorcas can be glazed or left plain. Pan de mallorca always has a powdered sugar topping, though. That’s a must.
Prepare the sugar glaze for the mallorcas while they are baking. You can also prepare the glaze one day in advance and keep it at room temperature. But, it’s easy to throw together, I make it as the mallorcas are baking.
In a small saucepan, stir together the light corn syrup, water, and granulated sugar. You can also make this glaze with honey instead of corn syrup, but it won’t taste as sweet. Bring the mixture to a boil over medium-high heat, stirring frequently. Let the mixture boil for 1 minute and take it off the stove. Allow the sugar glaze to cool until you’re ready to brush it onto the mallorcas.
Remove the mallorcas from the oven once they’re done baking, and allow them to cool for 5 minutes. Brush one or two layers of the sugar glaze onto the rolls. Let your sweet-tooth determine if you want to go a third round or not.
How Do I Top Mallorcas?

Mallorcas always have powdered sugar on top. It is optional, yes, but they won’t look like mallorcas without it. The rolls are amazing on their own, with the glaze, or with the glaze and the powdered sugar. A sugar topping is definitely the traditional way to go, though.
You can add spices to make yours unique, though. I love to add a pinch of ground cinnamon to the powdered sugar for my mallorcas. It adds even more warmth to their flavor. I just mix it into the powdered sugar with a spoon and sift it together.
Sift a generous amount of powdered sugar on top of the mallorcas to make them traditionally.
How Do I Serve Them?

Mallorcas taste best when freshly baked. The most common way to serve mallorcas is with a shot of espresso, cup of coffee, or café con leche. What’s great about them is you don’t need as much sugar in your coffee. Just dunk a mallorca in it. My kids eat theirs with milk and fresh fruit.
You can also use pan de mallorca as sandwich bread. Think Monte Cristo, but with a Puerto Rican accent.
How Do I Store leftovers?
Store leftover mallorcas in an airtight container at room temperature. Mallorcas taste best within 2 days of baking, but to make them even better, heat them for 30 seconds in the microwave. This gives them a freshly baked taste.
Can I Freeze Mallorcas After Baking?

If you’re a freezer-friendly type of baker, you can freeze mallorcas after baking them, but do it before you top them with sugar. The reason for that is because the sugar melts into the bread when you thaw them.
Transfer the cooled plain or glazed buns to a freezer-safe container. Freeze them for up to 2 months. You can thaw them at room temperature before sugaring them.
What Are Some Other Popular Puerto Rican Bread Recipes?

Along with Mallorcas, Pan Sobao, Quesitos, and Pastelillos de Guayaba are the most common breads and pastries in Puerto Rico. If you haven’t tried them, you really should take time to bake up a batch or two for one of the best breakfast spreads you can imagine.
Bake these Mallorcas some this week and let me know what you think. Don’t forget to pin and share this post with your pals!
Mallorcas Puerto Rican Breakfast Sweet Rolls
at Sense & EdibilityEquipment
- stand mixer
- sheet pan
- pastry wheel
- pastry brush
Ingredients
For the Mallorcas Sponge
- 1 cup (250 milliliters) whole milk
- 2 1/4 teaspoon (1 packet or 7 grams) active dry yeast
- pinch granulated sugar
- 5-5 1/2 cups (650-715 grams) all-purpose flour separated, plus more for rolling out the dough
For the Mallorcas Dough
- 1/2 cup (1 stick or 113 grams) unsalted butter at room temperature (save the butter wrapper for greasing your pan)
- 2/3 cup (140 grams) granulated sugar
- 1 teaspoons (6 grams) kosher salt
- 3 large eggs at room temperature
- Mallorcas sponge
Egg Wash
- 1 large egg
- 1 tablespoon (15 milliliters) cold water
Clear Glaze (optional)
- 1 cup (330 grams) light corn syrup or honey
- 1/4 cup (60 milliliters) water
- 1/4 cup (50 grams) granulated sugar
Powdered Sugar Topping
- 1/2 cup (65 grams) powdered sugar or as needed, for dusting
- 1/8 teaspoon ground cinnamon optional
Instructions
Mix the Sponge
- In a 2-quart saucepan warm the milk over low heat until it begins to steam, or 3 minutes. You can also heat the milk in the microwave for 1 minute. Remove the milk from the heat and allow it to cool to 110°F (45°C).
- In a medium-size mixing bowl, use a rubber spatula to combine the milk, yeast, pinch of granulated sugar, and 2 cups (260 grams) of the all-purpose flour until it forms a thick paste. Once the paste forms, cover the bowl with plastic wrap or a clean kitchen towel.
- Put the bowl in a warm, draft-free area of your kitchen. Allow the sponge to rise until doubled in bulk or for 1 hour.
Make the Mallorcas Dough
- Ten minutes before the rising time is finished, add the butter, sugar, and salt to the bowl of your stand mixer. Beat these ingredients together, using the paddle attachment, on medium-high speed for 4 minutes, or until the mixture looks pale yellow and fluffy.
- Decrease the mixing speed to low and add the eggs, one at a time, to the mixture in the bowl. Stop the mixer after the first egg is mixed in and scrape down the bowl and beater before adding the next egg. The mixture might look curdled once the eggs have been added. This is normal.
- Add the sponge and 1 cup of the remaining flour to the bowl. Blend on low speed just until a thick paste forms or 1 1/2 minutes. Switch from the paddle to the dough hook and scrape down the sides of the bowl.
- Add the remaining flour to the bowl. Knead the dough for 5 minutes on second speed. The dough will be soft and sticky when finished. Most of it while climb onto the dough hook, but the rest will remain in the bottom of the bowl.
Chill the Dough
- Use the butter wrapper to lightly grease a sheet pan. You can also do this with non-stick cooking spray or softened butter. Scrape the dough onto the sheet pan and use your rubber spatula to spread the dough into an even layer. It's okay if it doesn't spread to the edge of the pan, just make sure the dough is even.Cover the pan with plastic wrap and refrigerate the dough for 1-24 hours.
Form the Dough and Let it Rise
- Line 1 or 2 half sheet pans with silicone baking mats or parchment paper. If you want your mallorcas to be perfectly shaped, use 2 pans and only bake 6 at a time on each. If you don't care about the shape, you can bake all 12 on one pan.
- After the chill time, lightly flour a work surface. Scrape the dough from the pan to the countertop. Knead the dough 3 or 4 times to combine and smooth it. Using a lightly floured rolling pin, roll the dough into a 18" x 12" (45 cm x 30 cm) rectangle that's a 1/4" (.5 cm) thick.
- Use a pastry cutter (or pizza cutter) to cut the rectangle into twelve 1 1/4-inch (3 cm) wide strips. Starting at one end, roll each individual strip into coil. Spread the top of the roll (or the layers) open slightly once the roll is formed.
- Cover the pan with a clean kitchen towel and allow the rolls to proof in a warm, draft-free environment for 45 minutes to 1 hour.The rolls will be puffy, but may not have doubled completely in bulk.
Mix the Egg Wash and Prepare the Sugar Glaze (both can be done a week ahead and stored in the fridge)
- Preheat your oven to 350°F (180°C).While your rolls are proofing, use a fork to whisk together the egg yolk and water until smooth and free of lumps.
- In a small saucepan, use a rubber spatula or whisk to stir together the light corn syrup (or honey), water, and granulated sugar.Bring this mixture up to a boil over medium-high heat, stirring constantly to dissolve the sugar. Once the mixture comes to a boil, allow the mixture cook (boil) for 1 1/2 to 2 minutes before removing it from the stove and allowing it to cool.
Bake and Top the Rolls
- Once the rolls have finished proofing, remove the towel and brush them with a thin layer of the egg wash. Bake the mallorcas for 20-25 minutes at 350°F (180°C), or until they are a light brown color and sound hollow when thumped.
- Remove them from the oven and allow them to cool for 5 minutes. Brush one or two layers of the sugar glaze onto the rolls. You can brush more if you prefer a very sweet roll. You can also skip glazing the mallorcas altogether.
- Use a whisk to stir together the powdered sugar and ground cinnamon. To finish the mallorcas, sift a generous amount of powdered sugar mixture over each of the mallorcas. Serve the mallorcas with warm café con leche or cold milk. Enjoy within 2 days of baking them. The powdered sugar may be absorbed into the bread as they sit.
Notes
Tips and Techniques:
- The reason you don't roll the rectangle up like a cinnamon roll and cut it is because you want to keep that snail-shaped bun as sharp as possible.
- The dough may be very sticky after mixing. Chilling helps firm up the dough to make rolling it later more manageable.
- You can chill the mixed dough anywhere from 1 hour up to 24 hours. If you plan to keep it longer than 24 hours, I recommend freezing the dough.
- The glaze is optional, but the powdered sugar is a classic mallorca topping.
- Mallorca buns make great sandwich bread. Slice it halfway like you would a burger bun and use it to hold your sandwich fillings.
Freezing Instructions:
-
You can freeze the dough for mallorcas after you mix it:
- Spread the mixed dough onto a sheetpan.
- Cover the pan well with plastic wrap, and freeze it for up to 2 months.
-
Thaw the dough overnight in the fridge.
It may also add an additional 30-45 minutes of warming time once it has thawed. That's just because it will be extra-cold coming out of the fridge.
Storage Instructions:
- Store leftover mallorcas in an airtight container at room temperature. Mallorcas taste best within 2 days of baking, but to make them even better, heat them for 30 seconds in the microwave. This gives them a freshly baked taste. Redust them with sugar as needed.
- I recommend freezing them after baking them, but before you sugar them:
- Transfer the cooled plain or glazed buns to a freezer-safe container.
- Freeze them for up to 2 months.
- You can thaw them at room temperature before sugaring them.


I notice some comments you suggest to use bread flour but recipe says all purpose?
Hi Helen, that was in response to someone asking about using bread flour, which you can, but it will make the mallorcas a little chewier/tougher.
These mallorcas are super delicious, I am excited to make them again soon, thank you for sharing this recipe!
I’m so glad you liked them, Ramona!
These mallorcas are beautiful. I loved the fluffy, soft texture.
Yes, the soft texture of these mallorcas is one of my favorite things about them.
I love these mallorcas they remind me of the rolls my Tía used to make when I would go over to her house.
Aww, I love that, Sean!
This was my first time having these rolls and it won’t be my last! They were so good and such a treat- thank you!
My pleasure, Kathryn! I’m glad you enjoyed them.
These came out just like the Mallorcas we had in Puerto Rico! I’m so happy I found a recipe for these and that they came out so well. I’ll be making these often! Thanks.
My pleasure, Erin! Thanks for commenting!