Brioche is a French bread that is soft, buttery, and slightly sweet. What makes this such a wonderful recipe is that homemade brioche bread is not as intimidating to make as one might think, and it tastes worlds better than store-bought brioche. Moreover, you can also convert this homemade brioche recipe into many other bread recipes.
As a pastry chef, I count myself fortunate to have been able to travel around France and experience making an authentic French brioche recipe. No matter how proficient I am with European bread, I still have so much to learn, but this recipe? This is one of my masterpieces. Now you need to get it under your belt.
I originally published this post in 2018. I’ve updated the images and copy to make it more concise.

What is Brioche?
Brioche is, plain and simple, a bread dough from France made with a generous amount of eggs and butter.
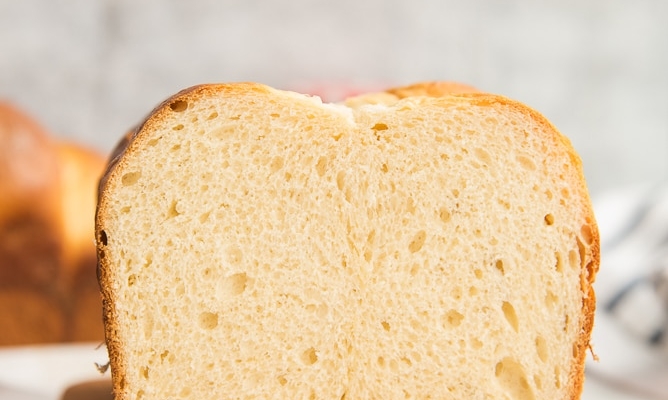
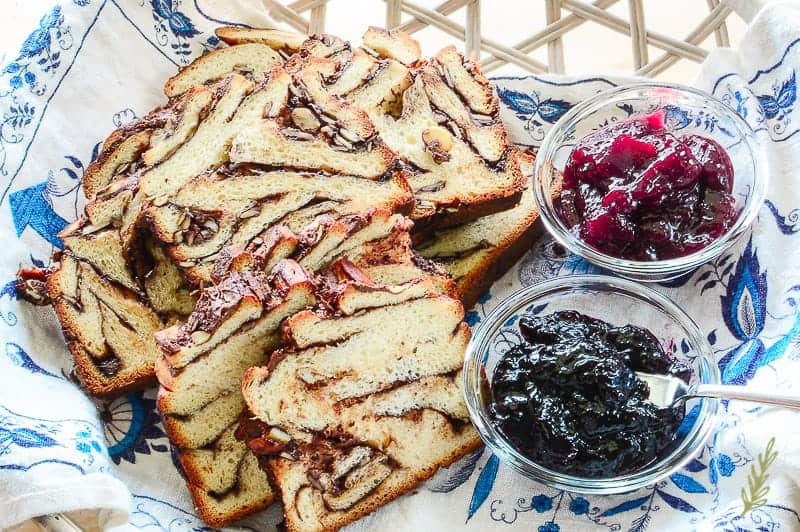
Brioche is an enriched dough with a buttery flavor. It gets that name because it contains a high butter content and plenty of eggs. The texture of baked brioche loaf is light and fluffy, with a soft crumb. It’s a sweet bread because of the added sugar and honey, not sweet bread sweet, but more like my Pan Sobao. As a result of all these fantastic qualities, it can be enjoyed by itself, slathered in butter (yes, more butter) or jam, or used in many other recipes. Use this brioche dough as the base for cinnamon rolls or bread pudding, or for brioche buns, french toast, brioche rolls, hot dog buns, hamburger buns, or as sandwich bread.
What Ingredients Do I Need to Make Brioche?

You most likely have all the ingredients you need to make this brioche dough recipe.
To make the brioche sponge, which begins the recipe, you need bread flour, honey, milk, and active dry yeast.
The remaining ingredients in brioche dough are more bread flour, large eggs, sugar, salt, and butter.
You mix the dough in your stand mixer or by hand.
What Is a Sponge?

A pre-ferment sponge, or simply “sponge,” is a thick yeast mixture that gives bread its flavor and allows the yeast time to rise and develop without interruption.
Most bread recipes are mixed in rapid succession with a proofing time (after the mixing) that allows the yeast in the dough to rise. Feeding the yeast the things it loves to eat, like sugar in the form of honey and lactose, as well as a warm liquid (milk), then leaving it alone allows it to work better in the dough later. Because we’re not combining it with large amounts of flour, we’re maximizing its potential before adding it to the rest of the ingredients. The alcohol produced by the yeast as it develops and ferments gives the brioche a malty, more nuanced flavor after baking.
How Do I Make the Sponge?

Add warm (110°F or 43°C) to the yeast in a small bowl along with the honey and milk.
The yeast begins to bubble and spread out as the warm milk activates it, and the yeast begins to feed on its sugar and honey. This process, called blooming the yeast, lets you know that the yeast is alive. The yeast is dead if you don’t see any movement in the bowl after 5 minutes. Discard the mixture and use fresh yeast to start this step over again.
Make sure you don’t kill the yeast for your brioche dough by using milk that is hotter than 110°F (43°C). Also, ensure the milk isn’t refrigerator cold, or your yeast will take a considerably long time to wake up.
Add the first portion of bread flour and the bloomed yeast mixture to a 3-quart mixing bowl. Use a rubber spatula or wooden spoon to stir the ingredients together to create a thick batter. Cover the mixing bowl with a clean kitchen towel and set it in a warm place free of drafts in the kitchen; a microwave or a cold oven are great locations for this.
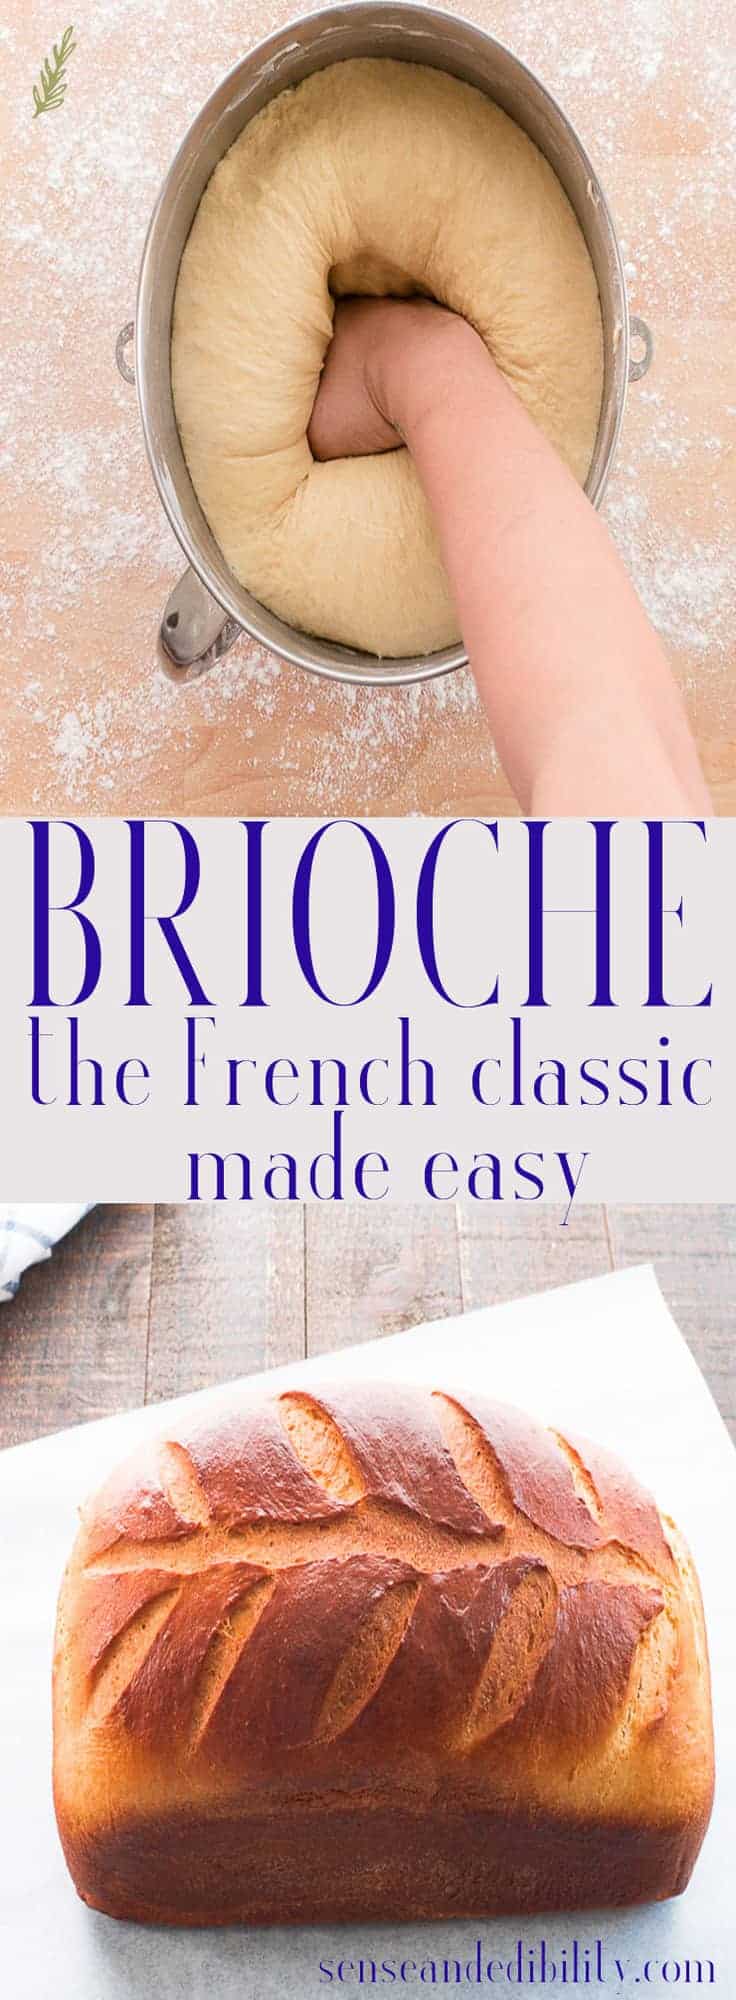
Leave the sponge to rise for 30 minutes undisturbed. The sponge will double in volume and look airy and spongy after this time.
Can I Use Instant Yeast in this Brioche?

You don’t need to bloom or “wake up) instant (or Fast Acting) yeast as you do with active dry yeast because it has been broken down into smaller particles. You add instant yeast directly to the dry ingredients in the recipe.
If you use instant dry in this recipe, but the brioche flavor won’t be as nuanced. Use the same amount and add it to the larger quantity of flour later on in the recipe.
How Do I Make the Dough?

All of the ingredients must be at room temperature. Part of the mixing process includes adding the butter to the dough in stages, which means the butter must be warm enough to mix into the dough completely.

Add the sponge, eggs, sugar, and salt to the bowl of a stand mixer or in a large mixing bowl. Do it in that order so the eggs can form a barrier between the salt and the yeast in the sponge since salt kills yeast. Add 2 cups of flour to the bowl.
Can I Replace the Bread Flour in My Brioche with All-Purpose Flour?
Use the paddle attachment to blend the mixture at medium-low speed until it is smooth. Add another cup of bread flour once the mixture is smooth.
Use a rubber spatula to scrape the bowl and the paddle down and switch to the dough hook attachment once the dough becomes too stiff and the machine sounds like it’s laboring.

Begin mixing again at 2nd speed, then add the remaining bread flour. Now, since we’re working with such an enriched dough, some factors may affect how much flour you need to add to your dough. The biggest factor is the weather. If you’re making this brioche on a hot, humid day, you might need more flour. So be prepared to add up to an additional cup of bread flour.
Bread flour is the best flour to use when making most breads. Since all-purpose flour doesn’t have the same percentage of protein, it doesn’t develop the same gluten structure as bread flour. The result is a dough that doesn’t have the proper gluten development you want in your bread.
How Do I Add the Butter to the Brioche Dough?

The best way to add the butter to the dough is to first test that the butter is soft enough by pressing a tablespoon of butter between your fingers. If it feels just cool to the touch and mushes slightly, then it’s the proper temperature, and you can add butter to the dough. The butter is too soft if it melts immediately when you press it. Put it in the fridge to firm it up for 5 minutes. Warm the butter for 10 seconds in the microwave if it still feels rock hard.
Start incorporating the unsalted butter into the dough two tablespoons at a time. Add the next two tablespoons of butter once the previous addition is no longer visible in the dough. While you wait for the previous addition to mix in, press the next one between your fingers to give it a head start.
How Long Do You Have to Knead Brioche Dough?

Knead the dough on second speed for 10 minutes once the butter is added. The dough will pull away from the sides of the bowl slightly.
Test a piece of the dough. It should be a slightly sticky dough but also soft, pliable, and smooth after kneading for 10 minutes.
Remove the dough from the bowl and lightly grease the inside of the bowl with the butter wrappers or with a neutral-tasting oil. Return the dough to the bowl and turn it to cover the surface of the dough with a protective layer of fat.
How Long Does the First Rise Take?

How Long Does the First Rise Take?
Cover the bowl with plastic wrap or a kitchen towel. Put the bowl of brioche in a warm, draft-free area and let the dough rise for an hour or until it’s doubled in bulk.
Punch the dough down to dispel the gases that have developed during the first rise. Scrape the dough out of the bowl with your hand or a dough scraper onto a lightly floured surface and knead the dough for 3 or 4 turns. This redistributes the yeast in the dough to give it some more stuff to feed on, which gives the bread a higher rise.
Do I Need a Special Pan for Brioche?
Use a bench scraper, or knife, to divide the dough into two equal portions. This recipe makes two 1 1/2 to 2-pound loaves. Make the full recipe. Freeze one for later and thank me later
Brioche is usually baked in a brioche pan to create a shaped dough called brioche à tête (brioche with a head or headed brioche). A plain 8 1/2 x 4 1/2-inch loaf pan works better for me, especially if I plan to toast the bread after baking it.
You can bake a plain loaf of brioche, but I like giving it a little personality, especially since it’s easy to do.

Cover one of the dough balls with a clean kitchen towel or plastic wrap while you work with the other. This keeps the dough from drying out or developing a crust.
Next, cut the uncovered dough into small balls of equal pieces (I usually get 8 pieces). Using the fleshy part of your palms- the sides of your hand- to pinch the bottom of a section of dough, roll the dough on a lightly floured work surface to form the ball into a perfectly round shape.
Place that ball of dough into a lightly greased loaf pan. Form the remaining sections of dough this way to fill the pan. It’s okay if you need to squish them into the pan. The more balls, the quirkier your baked loaf will be.
Cover your pan and repeat this process with the other half of the dough.
How Long is the Second Rise For the Formed Brioche?

Allow the brioche to rise for a second time in a warm area of the kitchen for 30-45 minutes or until slightly doubled in volume.
Preheat your oven to 375°F (190°C) while the dough rises. Adjust one of the racks, so it’s sitting in the lower third section of your oven. Instead of baking on the middle rack like you normally would, it’s a good idea to drop it down a notch to account for how the brioche will bake up.
Once the dough has risen just under double its size, brush the tops with an egg wash. At this point, you can sprinkle sesame seeds, poppy seeds, or kosher salt over the tops.

Bake the brioche in the preheated oven for 30-35 minutes or until the tops are a deep golden brown. The internal temperature of fully baked brioche loaves will be 190°F (88°C). The loaves will sound hollow when you tap them.
Remove the pans from the oven and allow the brioche to cool while inside the pans for 15 minutes. Carefully remove the loaves of bread from the pan once cool, and place them on a wire rack. You can slice and serve them after 30 minutes or let them cool completely.
How Do I Serve Brioche?

All you need to do now is eat your brioche bread. Taste your creation on its own without any toppings. I’m always excited at how a simple loaf of bread can be so delicious. You can top your brioche slices with jam, jelly, butter, peanut butter, or hazelnut spread.
You can also use this brioche to make your next grilled cheese, tuna fish sandwich, or any sandwich.
How Do I Store Leftover Brioche Bread?

To store baked brioche, tightly wrap the loaves in aluminum foil or plastic wrap or put them in an airtight container. The air causes bread to go stale, so avoid exposing your brioche to too much of it. Avoid storing brioche bread in the fridge because cold air causes it to stale faster. Instead, leave the wrapped bread on the counter or in a bread box for up to 5 days.
To “freshen” up the flavor of leftover brioche, warm it in the microwave for a few seconds, and it’ll taste like you just baked it.
Can I Freeze Brioche?

To freeze baked brioche loaves, allow them to cool completely and wrap the loaves in a layer of plastic wrap before transferring them to a freezer-safe bag. You can also wrap it in a layer of foil if your loaves are too big for a bag. Brioche freezes well for 2 months. To thaw the brioche, remove the bread from the freezer and leave it to thaw on the counter.
One taste, and you’ll see why this is the best brioche bread recipe ever. Make some time to try out this recipe- if you love it, share it with your world, and don’t forget to pin it, too!
Brioche Bread
at Sense & EdibilityEquipment
- 5-quart (or larger) stand mixer
- Two 8 1/2 x 4 1/2 loaf pans
Ingredients
For the Brioche Sponge
- 1 cup (240 milliliters) whole milk warmed to 110°F
- 1/4 cup (60 milliliters) honey
- 1 tablespoon (11 grams) active dry yeast
- 1 cup (120 grams) bread flour
For the Brioche Dough
- brioche sponge
- 8 large eggs at room temperature
- 1/2 cup (100 grams) granulated sugar
- 2 teaspoons (12 grams) kosher salt
- 6-6 1/2 cups (720-780 grams) bread flour
- 1 cup (226 grams) unsalted butter sliced and at room temp
Egg Wash
- 1 large egg yolk
- 1 tablespoon (15 milliliters) water
Instructions
Make the Sponge
- In a small mixing bowl, use a rubber spatula to combine the warmed milk, honey, and yeast. Allow the yeast to bloom for 5 minutes in the milk mixture. If the yeast shows no signs of movement or doesn't foam, discard the contents of the bowl and start over with fresh (new) yeast.
- Once the yeast begins to foam, pour a quarter of this mixture into a medium size mixing bowl filled with the first quantity of bread flour, stirring to form a thick, smooth paste. Add the rest of the milk and yeast mixture to the bowl, stirring, until a thick batter forms.
- Cover this mixing bowl with plastic wrap, or a clean kitchen towel. Place the bowl in the microwave or in a warm, draft-free area of your kitchen.Allow the sponge to rise until it has doubled in bulk or for about 30 minutes.
Develop the Brioche
- Add the brioche sponge, eggs, sugar, and salt to the bowl of a 5-quart (or larger) stand mixer. Do it in that specific order so the eggs can form a barrier between the salt and the yeast in the sponge since salt kills yeast. Add 2 cups (240 grams) of the bread flour to the bowl. Use the paddle attachment to blend this mixture together, on second speed, until it resembles a thick batter.
- Add 2 more cups (24 grams) of bread flour. Blend once again on second speed to bring the mixture together to form a soft dough. At this point, the dough will become too stiff to continue using the paddle attachment. Scrape the bowl and the paddle down using a rubber spatula and switch to the mixer's dough hook.
- Once the dough hook is on, begin mixing again on 2nd speed and add the remaining bread flour.* The dough should be stiff, but supple at this point.
Gradually Add the Butter
- With the mixer on second speed, add the unsalted butter to the dough two tablespoons at a time. When the butter you've added becomes absorbed into the dough, add the next two tablespoons. While you wait for the previous addition to mix in, press the next one between your fingers to give it a head start.Continue kneading the dough on second speed for 10 minutes after the butter all the butter has been added.
Allow the Brioche Dough to Rise
- Remove the dough from the bowl and lightly grease the inside of the bowl with the butter wrappers or with a neutral-tasting oil. Return the dough to the bowl and turn it to cover the surface of the dough with a protective layer of fat.Cover the bowl with plastic film or a kitchen towel and place the bowl of brioche once again in the draft-free area to rise for an hour or until it's doubled in bulk.
- After an hour of rising time, punch the dough down to dispel the gases that have developed during the rising. Lightly grease your bread pans with baking spray. Next, turn the dough out onto a floured surface and knead for 3 or 4 turns.
- Use a bench scraper or knife to divide the dough in half. Cover the piece of dough that you left whole while you work with the other. Cut the uncovered ball of dough into eight equal sections. Using the fleshy part of your palms rotate the balls of dough between your cupped hands to pinch the bottom of dough, forming a ball. Place that ball of dough into a lightly greased loaf pan. Form the remaining sections of dough this way to fill the pan. It's okay if you need to squish them into the pan. The more balls, the quirkier your baked loaf will be.
- Cover your pan and repeat this process with the other half of the dough. Allow the brioche to rise for 30-45 minutes or until slightly doubled in volume. Again, you want to keep them in a warm area of the kitchen for this.
Bake the Brioche
- While the brioche loaves are rising, preheat your oven to 375°F (190°C). Adjust one of the racks so it's sitting in the lower third section of your oven. Instead of baking on the middle rack like you normally would, drop it down a notch to account for the way the brioche will bake up. Prepare the egg wash: in a small bowl, beat together the egg yolk and water until smooth and runny.
- Once the dough has risen just under double its size, brush the tops with an egg wash. Bake the brioche for 30-35 minutes, or until the tops are a deep golden brown. When tapped the tops of the loaves should sound hollow. If they don't continue baking the for an additional 5 minutes.
Cool and Serve the Brioche
- Remove the brioche from the oven and allow the bread to cool inside their pans for 15 minutes. Once cool, carefully remove the loaves of bread from their pans and place them on a cooling rack. You can slice and serve them while they're still warm or let them cool completely.
Notes
Tips and Tricks:
- If you're making this brioche on a very hot, humid day, you might to knead in more bread flour up to an additional cup (120 grams).
- The easiest way to prep the butter for use is to unwrap it and cut it into tablespoon pats (use the wrapper as a cutting guide).
- Test that the butter is ready to use by pinching a tablespoon of butter between your fingers. If should feel cool to the touch and slightly mushy. If smears easily, it's too soft; put it in the fridge to firm up for 5-10 minutes. If it's rock hard, heat it for 15 seconds in the microwave.
Optional Toppings
After brushing the tops of the loaves with egg wash top with one of the following:- 1 tablespoon of sesame seeds
- 1 tablespoon of poppy seeds
- a generous pinch of sea salt
- 1/2 cup chopped nuts
Storage and Freezing Instructions:
- Wrap the brioche loaves in storage wrap or put them in a airtight container. Leave the wrapped bread on the counter or in a bread box for up to 5 days.
- Don't store your brioche in the fridge. Cold air will also cause it to go stale faster. Instead, just
- To "freshen" up the flavor of leftover brioche, just warm it in the microwave for a few seconds.
- To freeze the baked loaves: allow the bread to cool completely. Then, wrap the loaves in a layer of plastic film, and transfer them to a freezer storage bag. You can also wrap it in a layer of foil if your loaves are too big for a bag.
- Freeze the brioche for 2 months.
- To thaw frozen brioche, just pull the bread out of the freezer and let it thaw on the counter.
- I don't recommend freezing the brioche dough before baking. The loaves never bake up as high when you do that.
Nutrition


Great recipe! I must admit I did halve the recipe, simply because I don’t have a mixing bowl/stand mixer big enough for a full batch. I can confirm that it still turned out great and my loaf was amazing and wonderfully fluffy. If I had a bigger mixer, I would be very glad to have two loaves!
I’m glad you liked it, but if for no other reason, save up for a larger mixer because don’t you want to have two loaves now that you’ve tasted it?? LOL!
I’m going to be honest, I didn’t think I could pull this recipe off because brioche just seems intimidating to get right. That said, your recipe was perfectly helpful and the instructions and photos helped me get it just right! Thank you!
That’s so awesome, Jazz!
I could devour an entire loaf! This bread looks amazing! Thank you so much for sharing!
I may or may not have done that… Glad you like it Lori.
This was so soft, scrumptious and tempting! I loved it with jam, and also butter! The best brioche recipe so far!
Thanks Farrukh!
Ever since I tried brioche on one of my travels, I just can’t get enough of it. That texture is absolutely outstanding – very excited to try your recipe!
I hope you like it, Elaine. Let me know what you think.
I too have eaten brioche in Paris and it’s my all time favourite bread. I’ve never had the courage to make it myself, but having read this post through a couple of times I’m ready to give it a try!
Let me know how it turns out!