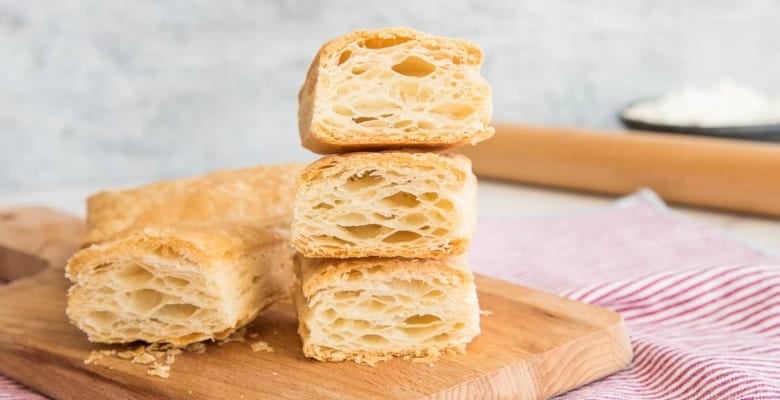
Puff Pastry, feuilletage or pâte feuillettée in French, is a light, flaky pastry of a laminated dough made with layers of butter and dough. It is the base for desserts like napoleons, pastries like Quesitos or fruit turnovers, and savory recipes like beef wellington and cheese straws. In this tutorial, I’ll teach you everything you need to know to achieve success when making your dough.
This article was originally published in October 2019. I’ve updated the recipe to include metric measurements and snazzy new pictures.

What is Puff Pastry?
My most stressful class in culinary school was Classical Pastries. Chef Jan Bandula was the instructor, and he was also a Certified Master Pastry Chef. And he was European. Failure was not an option in any of his courses. But Chef Bandula also wanted us to win. He never made us feel like idiots if our bread didn’t rise or our chocolate didn’t set up. Because of him, I veered off of the culinary course I began culinary school on and navigated straight to the pastry shop. One of the recipes I learned in Chef Bandula’s class, which I still hold dear to my heart, is Puff Pastry.
The two components of puff pastry are the détrempe and the beurrage. A mixture of flour, butter, and water make up the détrempe. The beurrage is simply butter mashed together with flour, an acid (lemon juice), and salt. The butter mixture is wrapped inside the dough, and the two become one. You end up with a dough with at least 513 layers of fat and dough. In the end, your pastries have dozens of layers of flaky, crisp, buttery goodness.
Where does Puff Pastry come from?
Puff pastry is a French invention. The classic French preparation of this recipe results in a pastry of 1,500 layers. This obscene amount of flakiness is where the French pastry, napoleons, gets its name mille-feuille, which means “a thousand leaves.”
Why make Puff Pastry from scratch?
Before beginning this recipe, you need to know that it requires time. The preparation and folding are not difficult, nor does this recipe require advanced pastry skills. Most people avoid making puff pastry at home because it requires a couple of hours to make from start to finish. But, most of that time is the required chilling time that the dough must undergo to make the puff pastry properly. If you don’t count the chilling periods, making the puff pastry takes less than an hour.
Making puff pastry from scratch is as easy as making pie dough. Homemade puff pastry also tastes butterier than store-bought dough. You probably have all of the ingredients to make puff pastry in your kitchen. In short, making puff pastry dough from scratch is worth it because it tastes better, you already have everything you need, and just because you can.
What ingredients are in Puff Pastry?

You only need 6 ingredients to make puff pastry. One of those is cold water, so, technically, you only need 5.
Breaking this recipe down into the two parts of the détrempe and the beurrage, I start with the beurrage because it needs to chill as long as the détrempe and it’s messier. You need unsalted butter, bread flour, lemon juice, and kosher salt to make the butter layer for the puff pastry. The only piece of equipment you need is a mixing bowl. Maybe a knife to cut the butter into small pieces, but that’s it.
Can I use a different fat to make Puff Pastry?

You shouldn’t make puff pastry with any fat other than butter. Plenty of fats are marketed as the “best thing” for puff pastry, but they’re lying. I would never lie to you. Forget the calorie count in this recipe. That’s not what we’re here to do. Puff pastry has a significant calorie count because it’s a butter-layered dough. Butter is the only fat worthy of this decadent pastry. It melts in your mouth, leaves layers as crisp as fallen fall leaves, and tastes sublime.
Classic European puff pastry is made by hand. Use the warmth of your hands to mash the room temperature butter into a smooth paste. Break up the bigger chunks until the butter resembles peanut butter. You can use a hand mixer for this if you have dexterity or other issues with your hands.

Add the bread flour, lemon juice, and salt to the paste in the bowl. Adding the bread flour creates a loose dough that is closer to the consistency of the dough layer than butter alone. Additionally, the lemon juice gives the butter some pliability to make it “stretch” along with the détrempe.

Use your hands (or an electric mixer) to blend the flour and the rest of the ingredients into the butter. Once you have a smooth paste, you can form it to chill.
What do I need to make the Détrempe?

You need all-purpose flour, bread flour, unsalted butter, kosher salt, and ice cold water for the dough portion of this recipe.
The equipment you need for this stage is a mixing bowl, a sharp knife (or bench scraper), and, eventually, a rolling pin.
Do I have to use two types of flour?
Puff pastry is mixed exactly like pie dough is. The reason you use two types of flour to make puff pastry is to give the dough a balance of proteins. All-purpose is a softer flour, meaning it doesn’t have a high protein content. Bread flour, on the other hand is a hard flour. It has a higher percentage of protein than most other flours. If you were to make puff pastry with only bread flour, you’d fight against it and the end result would be an inferior product in height and texture. All-purpose flour cuts the bread flour to make it more friendly to the folding process it’s about to undergo.
Combine the two flours and the kosher salt on a clean work surface or use your hands to mix them together in a large mixing bowl.
What’s the difference between Puff Pastry and pie dough?

Take the butter and grate, cut, or tear it into 1/4-inch pieces or thin shreds. Use your fingers to cut the butter into the flours until the mixture looks coarse and sandy, like coarse-cut cornmeal. If you have a food processor, you can also use it instead of your hands to do this, but I find it warms the butter too much and makes the détrempe gummy.
Gather the mixture into a pile, then use the bottom of a measuring cup to form a well in the center of the pile.

Pour the ice-cold water into the well (or over the flour in the bowl) and use your hand or a bench scraper to fold the flour into the water.
Knead everything together just until the mixture forms a soft dough. Don’t over-mix the dough because you don’t want to develop too much gluten. Producing excess gluten through mixing will cause the finished dough to shrink back while you try to roll out the puff pastry later.
Form the mixture into a rude rectangle shape and wrap it in plastic wrap. Transfer the dough to the refrigerator and let it chill for 10-15 minutes. This gives the gluten in the dough a chance to relax.
You can freeze the dough at this point, but you’ll have to thaw it and bring it to the proper consistency before proceeding.
What is laminated dough?

You haven’t made puff pastry yet. That only happens when you combine the beurrage and the détrempe. Puff pastry is a laminated dough. Some other examples of laminated dough are croissants and danishes. A laminated dough is one in which fat and dough are folded over one another to create multiple layers. Some laminated doughs have added leaveners to help the dough rise, but puff pastry relies solely on steam for its height. The water in the layers of butter quickly evaporates in the very hot oven, disappearing and leaving in its place empty pockets. Those pockets between the crisp layers of dough give the puff pastry its flaky texture.
Puff pastry is made with three four-fold turns of dough. Folding in the butter layer does not count as a turn or fold when making puff pastry.
Use a heavy rolling pin to roll the dough out into a large rectangle that around about 20-inches (50 cm) long by 15-inches (38 cm) wide. Measurements don’t have to be exact, but you want to roll it out, so it’s between 1/4 to 1/3-inch thick. Try to make or keep the corners as square as possible. Use an offset spatula to spread the butter mixture over 2/3rds of the dough layer. The butter layer should be spreadable, but not oozing. Make sure to keep the butter in an even layer.
How many times do I have to fold the Puff Pastry?

Fold the unbuttered dough third over the adjacent third. Then, fold the remaining third over the exposed dough. This is much like folding a letter.
Transfer the dough-butter package to a sheetpan and cover it lightly with plastic wrap. Refrigerate the dough for 15 minutes to give the gluten in the dough a chance to relax.

After 15 minutes, uncover the dough and roll it into a rectangle about 20-inches (50 cm) long by 15-inches (38 cm) wide. The dough will be about 1/4 to 1/3-inch thick.
Fold the two short ends into the center of the dough so their edges meet in the middle of the rectangle. Next, take one of the short edges and fold it over the other, like you’re closing a book.
This is your first of three 4-folds.
Why is it hard to roll out the Puff Pastry?

After the first turn is completed, return the “book of dough” to the sheetpan and cover it with the plastic film. Chill the dough for 25-30 minutes to give the gluten a chance to relax.
Turn the dough 90 degrees so the length becomes the width, or so the short ends are on the left and right. You’re going to turn your dough this way after every fold to ensure your puff pastry layers are consistent and rolled in every direction.
Roll the dough out lengthwise into a rectangle with the same dimensions as the first rectangle. Keep those corners as square as you can. Don’t press down when rolling. Instead, roll evenly and smoothly. Also, try not to run over and down the edges of the dough. This keeps the layers of dough from sticking together.
This is your second 4-fold turn. Give the dough a chance to rest another 25-30 minutes before repeating these steps once more for a total of three 4-fold turns.
If you find that the dough is too hard to roll out, it’s most likely because it was over-mixed during the making of the détrempe. Giving it more rest time may help, but you might have to leave it overnight to give the gluten a while to rest.
What’s the difference between Puff Pastry and Blitz Puff Pastry?

A quick note on the difference between the two.
Blitz puff pastry differs from puff pastry in that it does not contain a butter layer. Instead, more butter is cut into the flour, and the resulting dough is folded over, rolled out, and folded over again. My Buttermilk Biscuits recipe uses this technique.
Once the dough is finished, divide it into 4 pieces of equal (or as close to equal) weights. I usually get 3 1-pound 9-ounce bricks and one that is heavier. You can eyeball it, though. Wrap each piece of puff pastry in a layer of plastic wrap and store them in a covered container or food storage bag for up to 4 days.
What do I use Puff Pastry for?

Puff pastry can be used to make most of your favorite breakfast pastries, like:
And so many other recipes. You can use one piece of puff pastry for most recipes that call for a package (or box) of store-bought dough.
How thin do I roll the dough?

When rolling out puff pastry dough for your recipes, it’s important to roll it thinly- or about 1/8 to 1/4-inch thick. You’re going to be shocked at how much it rises once it’s baked. The reason why it’s important is that the dough will only rise so high in the hot oven before it starts to burn. The thicker you roll it, the more time it needs to rise.
Also, always bake the puff pastry in a very hot oven, at least 400°F (205°C). A blast of high heat encourages the dough to shoot up as that water in the butter evaporates and leaves those layers I told you about earlier. If you bake it at too low a temperature, you risk less-than-stellar layers.
Why does my Puff Pastry bake up soggy?

High heat is a must for baking puff pastry because it prevents the dough from becoming soggy as it bakes. If you don’t hit it with high heat, the butter melts into the dough instead of leaving that void between the layers.
Check that you’re baking at the proper temp of at least 400°F (205°C). Also, make sure you’re cutting your dough with a very sharp knife to prevent the layers of puff pastry from sticking together while baking. Finally, never bake the dough while it’s warm. If the butter is already soft, it will melt into the dough. It’s better to chill the dough than bake it while it’s warm.
How long can I store Puff Pastry in the fridge?
You can store prepared puff pastry dough in the fridge for four days. Don’t store it any longer than that, or the flour in the dough will start to ferment and turn gray.
Can I freeze Puff Pastry?
The best way to store puff pastry is in the freezer. Wrap your pieces of dough in plastic wrap and put them into a freezer-safe storage bag. Store the puff pastry in the freezer for 6 months. Remember to thaw the dough in the refrigerator and allow it to warm up slightly on the countertop before rolling it out.
You’re going to see that making your own Puff Pastry at home isn’t nearly as hard as you thought. Be sure to pin this recipe to your bread or pastry board, and don’t forget to share it with your friends and family!
Puff Pastry
at Sense & EdibilityEquipment
- heavy rolling pin
- half sheet pan
Ingredients
Butter Mixture (for folding in)
- 3 cups unsalted butter whole or diced and at room temperature
- 1/2 cup bread flour
- 1 teaspoon lemon juice
- 1/2 teaspoon kosher salt
Dough Base
- 4 1/2 cups all-purpose flour plus more for dusting the work surface
- 2 cups bread flour
- 1 tablespoon kosher salt
- 1/2 cup unsalted butter grated or diced and very cold
- 2 cups ice water (plus 1/4 cup as needed)
Instructions
Make the Beurrage (Butter Layer)
- In a large mixing bowl, use the heat from your hands to soften and mash the unsalted butter into a thick, peanut butter-like paste. Add the bread flour, lemon juice, and salt to the paste in the bowl. Use your hands to mash these ingredients into the butter to create a smooth, thick paste.
- Cover the bowl with the beurrage in plastic wrap and transfer it to the fridge to chill for about 20 minutes*.
Prepare the Détrempe (Dough Layer)
- Mix or sift the all-purpose and bread flours onto a clean work surface (or in a mixing bowl). Use your fingers to toss in the kosher salt.
- Use your fingers to cut the cold butter into the flours until the mixture looks coarse and sandy, like coarse-cut cornmeal.Gather the mixture into a pile, then use the bottom of a measuring cup to form a well in the center of the pile.
- Pour the ice-cold water into the well and use your hand or a bench scraper to fold the flour into the water.Knead everything together just until the mixture forms a soft dough. Don't overmix the dough because you don't want to develop too much gluten.
Encase the Butter Layer in the Dough
- Use a heavy rolling pin to roll the dough out on a floured surface into a large rectangle that's around 20 x 15 inches (51 x 38 centimeters). Measurements don't have to be exact, but you want to roll it out so it's between 1/4 to 1/3-inch thick. Try to make or keep the corners as square as possible.
- Use an offset spatula to spread the beurrage in an even layer over 2/3rds of the dough. Fold the unbuttered dough third over the adjacent third. Then, fold the remaining third over the exposed dough— like you're folding a letter.
- Transfer the dough-butter package to a sheetpan and cover it lightly with plastic wrap. Refrigerate the dough for 15 minutes to give the gluten in the dough a chance to relax.
Complete Three Four-Fold Turns of the Dough
- After 15 minutes, uncover the dough. Turn the dough 90 degrees so the length becomes the width, or so the short ends are on the left and right. Roll it into a rectangle 20 x 15 inches (51 x 38 centimeters). Don't press down when rolling out the dough. Instead, roll evenly and smoothly. Also, try not to run over and down the edges of the dough. This will prevent the layers of dough from sticking together.
- Fold the two short edges into the center of the dough to meet at the halfway point of the rectangle. Next, take one of the short edges and fold over the other half, like closing a book.
- This is your first of three 4-folds. Use the knuckle of a bent finger to press a divot into the end of the "book" to keep track of the turns completed. After the first turn is completed, return the "book of dough" to the sheetpan and cover it with the plastic film. Chill the dough for 25-30 minutes to give the gluten a chance to relax.
- Turn the dough 90 degrees so the length becomes the width, or so the short ends are on the left and right. Turn the dough this way after every fold to ensure the puff pastry layers are consistent and rolled in every direction.
- Roll the dough out lengthwise into a rectangle with the same dimensions as the first rectangle, keeping the corners as square as you can. This is your second 4-fold turn. Give the dough a chance to rest another 25-30 minutes before repeating these steps once more for a total of three 4-fold turns.
Divide the Dough and Wrap to Use in Recipes
- Once the dough is finished, divide it into 4 pieces of equal (or as close to equal) weights. Ideally, you can get 3-1lb 9oz (or 700 grams) bricks and one that is heavier. You can eyeball it, though or even decrease the weights of each to get more portions of dough.
- Wrap each piece of puff pastry in a layer of plastic wrap and store them in a covered container or food storage bag for up to 4 days.
- You can use one piece of puff pastry for most recipes that call for a package (or box) of store-bought dough.
Notes
Swaps and Substitutions:
- Replace the lemon juice with lime juice, white distilled vinegar, or vodka.
- The butter stage can be done in a stand mixer, mixing on the lowest speed.
- If you have a food processor, you can also use it instead of your hands to cut the fat into the flour, but I find it warms the butter too much and makes the détrempe gummy.
Tips and Techniques:
- *You want the butter layer to be firm enough so it doesn't ooze when you spread it onto the dough layer, but not so firm that it breaks when you press a finger into it. The butter and dough layers need to be the same consistency when you fold them together.
- Folding in the butter layer does not count as a turn or fold when making puff pastry.
- If you find that the dough is too hard to roll out, it's most likely because it was overmixed during the making of the détrempe. Giving it more rest time may help, but you might have to leave it overnight to give the gluten a while to rest.
- When rolling out puff pastry dough for your recipes, it's important to roll it thinly- or about 1/4-inch thick.
- Bake the puff pastry at the proper temp of at least 400°F (205°C).
- Make sure you're cutting your dough with a very sharp knife to prevent the layers of puff pastry from sticking together while baking.
- Never bake the dough while it's warm or it will melt into the dough. It's better to chill the dough than to bake it while it's warm.
Storage Instructions:
- You can store prepared puff pastry dough, wrapped in plastic wrap, in the fridge for four days. Don't store it any longer than that, or the flour in the dough will start to ferment and turn gray.
Freezer Storage:
The best way to store puff pastry is in the freezer:- Wrap your pieces of dough in plastic wrap and put them into a freezer-safe storage bag.
- Store the puff pastry in the freezer for 6 months.
- Thaw the dough in the refrigerator and allow it to warm up slightly on the countertop before rolling it out.


I’m making this puff pastry right now. Going into fold #3 in 15 minutes. I did find that it seemed like there was way too much butter for spreading, so I divided the butter in half and incorporated it in 2 separate folds before starting the four folds. I also chilled it before starting the first four fold because I had handled it more. Do you think this will affect the end product? I’m going to use it for individual beef Wellingtons on New Year’s Day, so, fingers crossed!
This is a different method than I’ve used before and the dough is much softer and less elastic, which is great when rolling out.
The puff pastry may not rise as high as it should, but it will still taste great. I’ve never found that the amount of butter is too much for spreading, but let me know how your method turns out. Happy New Year!
After doing research, I found your recipe and I can attest this is the professional way of making puffed pastry – which is rare to find. Most do not take into account the different flour types to get the exact amount of gluten, they don’t tell you to add the flour to the fill-in butter to maximize lift, nor do they tell you the process is laminating the dough. 🙂 I’ve also found the room temperature and the cooking temperature are important also.
I’m trying to make lady locks (aka. cream horns). I’m from western PA where these are a big deal, especially on cookie tables at weddings. The old timers used shortening and added 1/2 to 3/4 c with each fold. I was wondering if you could help me with this, because mine where too greasy and didn’t puff enough. Can you see what you would change with either of these recipes that I have?
Lady Locks
3c AP flour, 1 tsp salt, 1.5c water dough. fill-in is 2c shortening
or
3c AP flour, 2 tbsp sugar, 2 egg yolks, 1.25c water. fill-in 2c shortening
P.S. I hope you continue to make more YouTube videos! 🙂
Thank you for your encouragement. It’s so much easier to show people how to make a recipe than to write, but I’m glad you appreciate the effort.
As for your lady locks: first, what an interesting recipe! I’ve never tasted one, but I do love cream horns. Did you happen to chill the dough in between each fold in of the fat? To include the final fold in and after you formed them? Though I like to stay true to the way people in the old days did it, I do find that cutting the shortening with the butter helps to cut down on the greasiness because it chills up more solid than shortening alone. That said, what about temps? Lots of times, puff pastries need to bake at 400°F or the fat has too much time to melt and make the pastry greasy.
Try out those modifications and if they don’t work, blend a 1/4 cup of flour in with the shortening before spreading it on the dough. That will help reduce some of the greasiness, too.
Marta, I absolutely LOVE you! I’ve looked the internet over to find out how to make these things, so your help is priceless. Cream horns are lady locks, if we are saying they are the puffed pastry that is cut into 1″x6″ pieces which are wrapped around clothespins (old fashioned way) and filled with a cream. I did chill between all the steps, for an hour, but I see you and the pros suggest a shorter chill time (maybe just for butter, IDK). I will try doing 75/25 shortening/butter, respectfully. And baking at the higher temp of 400. I only baked at 350. I did two batches and I found that baking them 12 minutes instead of 10 somehow made them a little less greasy. You’ve given me lots of good info. Especially the flour in the fill-in fat! I love it!!
I pray the Lord blesses the work of your hands. May He increase your portion and expand your boundaries.
But the blessing though!!!!!!!??????Thank you so much, Heather. I do hope your lady locks are the best you’ve ever tasted.
Enjoy your holidays and God bless you.
Hi there- was followed your recipe to the letter and the final product turned out a bit tough- any pointers as to what I may have done wrong?
Tough dough is usually the result of too much gluten being developed during the mixing or folding process. Did you use cake flour and bread flour? If not, what types of flour did you use? If you used the cake and bread flours, did you knead the first dough just until combined? Let me know and we can go from there to figure out what happened.
Hi,
Can this dough be frozen and for how long?
Yes, in step 5 I mentioned that it can be frozen for up to 3 months
Hi,
what if the butter melts? I live in a quite warm area.
It’s really important to allow the dough to chill well between each turn. If it feels soft and warm after the 30 minutes of chill time, leave it in the fridge for another 15-20 minutes.
If it melts with chilling properly, you can probably still use it for pie dough.
I need to try this some time soon!!!
With your dumpling experience, this is going to be a walk in the park for you!