Tembleque is one of Puerto Rico’s traditional coconut recipes. This beloved dessert is infused with warm spices and a kiss of citrus, making it more than just a holiday treat — it’s a work of art that deserves a place on your table all year long. If you’re craving something light, sweet, and easy to whip up or want to bring a little island vibe to your kitchen, tembleque (and its shimmy) is here to steal the spotlight.
*This post is updated from the original I published in 2021. The recipe is the same.*

What Is Puerto Rican Tembleque?
Tembleque– pronounced tehm-BLEH-kay, is a traditional Puerto Rican coconut pudding recipe. This popular Puerto Rican recipe is very similar to French blanc mange or Filipino maja blanca; and though many other Caribbean islands serve similar puddings, Puerto Rico is where tembleque originated.
Tembleque comes from the Spanish “temblar,” meaning to tremble or shake, and that’s exactly what it does when it’s unmolded. Puerto Ricans commonly serve tembleque during the holidays, especially at Christmas or Easter, but my family enjoys it year-round.
Tembleque has a strong coconut flavor with hints of cinnamon and other spices and a slight hint of citrus. Orange blossom water or orange peel is a not-so-secret ingredient in my tembleque recipe.
Texturally, tembleque and flan are similar but aren’t the same dessert. Unlike flan, which is thickened with eggs, tembleque is thickened with cornstarch; it also doesn’t have a caramel sugar topping as flan does.
Older recipes for tembleque call for orange blossom water to the pudding base; however, most people don’t have it in their pantries. Oranges are commonly found in kitchens, so I add a subtle hint of orange by infusing the coconut milk with a couple of orange peels and warming spices. Feel free to omit the orange peel or substitute lime zest or lemon peel.
Because it’s naturally vegan, tembleque is a great dish for large gatherings or dinners with multiple dietary preferences.
What Do I Need To Make It?

You can make tembleque with fresh or canned coconut milk, granulated sugar, cornstarch, vanilla extract, orange peel, cinnamon sticks, star anise, cloves, fresh ginger, nutmeg, and kosher salt. Except for the cinnamon, the spices I use are optional, so you can add or omit them.
You’ll need a heavy-bottomed saucepan with sloped sides, a whisk, and a mold for the tembleque.
Can I Use Canned Coconut Milk?

There really is no equal replacement for fresh coconut milk when making tembleque. But even I must admit that tembleque made with canned milk does taste more coconutty. Tembleque made with canned coconut milk will have a metallic taste and a grey undertone, whereas fresh coconut milk gives it a mellow flavor and makes the pudding milky white. If using canned milk is easier, replace the fresh milk with equal amounts of canned.
Add the cinnamon stick, star anise, whole cloves, a few scrapes of nutmeg, and salt to the coconut milk and orange peel in the pot. Bring this mixture up to a simmer over medium-high heat. The fat solids in the milk will begin to separate a bit and make the liquid look curdled., this is totally normal.
Can I Use Ground Spices In This Recipe?

Canned coconut milk tastes like canned coconut milk: very processed. Tembleque made with canned coconut milk does taste more coconutty (since the milk is concentrated) but has a metallic taste and a grey undertone. Fresh coconut milk has a mellow flavor and makes your tembleque milky white. If you prefer canned milk, replace the fresh coconut milk with the same amount of canned.
Add the cinnamon stick, star anise, whole cloves, a few scrapes of nutmeg, and salt to the coconut milk and orange peel in the pot. Bring this mixture up to a simmer over medium-high heat. The fat solids in the coconut will begin to separate a bit, making the liquid look curdled. That’s totally normal.
How Long Do I Steep The Spices?

After steeping the spices, stir the sugar into the warm milk using a French whisk. Authentic tembleque isn’t a super sweet dessert because our ancestors didn’t use sugar excessively. Yes, I realize the irony of people who worked in sugar cane fields not consuming as much sugar as we typically do today. It is what it is.
Because I want the coconut flavor to shine, I don’t add a ton of sugar to mine. If you have a bigger sweet tooth than I do, add an additional 1/4 cup of sugar here.
Using ground spices to flavor your tembleque makes this recipe easier to prepare, but they will cause it to look beige instead of white, as it should look. Ground spices are easier to work with, so I’ve included their measurements in the tembleque recipe card.
Add the ground spices with the sugar to the tembleque milk if you’re using them instead of whole spices. Whisk the sugar and spices together first to keep the spices from clumping when you whisk them into the milk. Once you add the sugar, stir the milk for at least 1 minute to dissolve the sugar.
How Do I Thicken The Pudding?

Puddings are desserts thickened with something other than eggs. Tembleque is thickened with cornstarch or cornflour, making it a gluten-free dessert (as long as it’s produced in a gluten-free facility).
If you are allergic to cornstarch (or cornflour), here are a substitutions to cornstarch which you can use to thicken tembleque:
- Tapioca flour (cassava or yuca flour) is the best replacement for cornstarch, but you’ll need to increase the amount to 1 cup. Tapioca flour holds considerably well and also freezes well.
- You can also thicken the pudding with arrowroot using the same measurements. Arrowroot doesn’t hold for extended periods, so if you plan to make this ahead, be prepared for a significant change in texture as it sits (I’d use arrowroot powder only as a last resort).
In a separate bowl, add the remaining coconut milk to the cornstarch in a steady trickle. Whisk the mixture constantly as you pour the milk into the cornstarch to avoid clumps. Add this slurry to the hot milk in the pot to thicken the tembleque.
How Do I Know If My Tembleque Is Thick Enough?

Use a slotted spoon or a small strainer to remove the whole spices from the coconut milk in the pot. Discard the spices since you had them in fatty milk, which can spoil.
Turn the stove on to medium heat. Add the cornstarch slurry to the pot in a slow, steady trickle while whisking constantly. Dumping the slurry into the still-hot coconut milk will clump to all hell, so do this slowly.
Allow the mixture to come up to steaming once all the slurry is in the milk. Continue stirring constantly, paying close attention to the edges of the pan, which heats up faster. Whisk the slurry from the outside of the pan into the center to create a smooth pudding. After about 1 1/2-2 minutes, the tembleque will thicken to the point where it resembles mayonnaise. The pudding should not be super stiff because it won’t wobble once it’s cooled. You also don’t want it too thin because it won’t set up properly.
If your tembleque is too thin, allow it to simmer for 30 seconds to 1 minute longer. Make more slurry with 1 tablespoon (each) of cornstarch and cold water stirred together until smooth. Add it to the pot the same way as before and see if that thickens it. If the pudding is thick, like a paste, thin it with more milk until it reaches a mayonnaise consistency.
Remove the pot from the stove and stir in the vanilla. Continue stirring for 30 seconds to cool the pudding slightly.
What’s The Best Mold To Use Here?

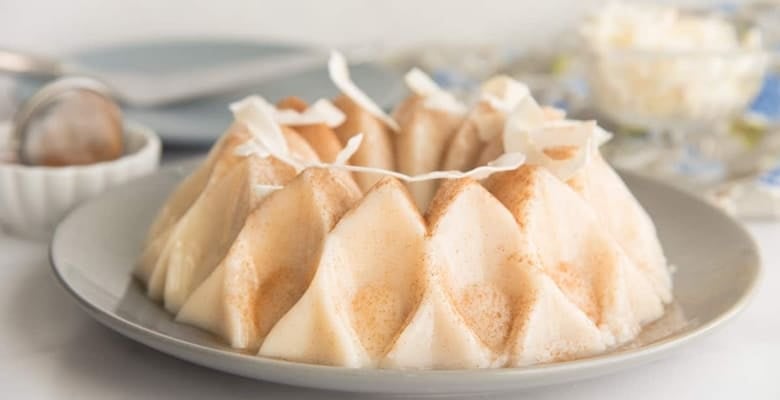
Aside from eating it, the best part of making tembleque is when it’s unmolded and starts to wiggle; seeing its decorative appearance is also pretty awesome. That’s why I always make my tembleque in this crown bundt pan from Nordic Ware; it comes out beautifully. You can use a flexible silicone pan, but I have seen people break their tembleque when removing it from them. You also don’t want a super-intricate mold since the pudding will stick in pans with too many details. It’s totally fine for you to pour it into a simple, flat-bottomed serving dish, too.
Water, non-stick spray, or oil are two ways to ensure your tembleque releases from the mold in one piece. I prefer the water method because it doesn’t leave an oily residue or aftertaste on my pudding.
For the water method:
- Add 1 1/2 tablespoons (22 milliliters) of room-temperature water to the empty mold.
- Move the water around in the mold to moisten it. Be sure to get the center tube if your pan has one.
- Once you’ve wetted the inside of the pan, let the excess water pool at the bottom of the mold.
- Pour the hot tembleque into the mold. Move the pot around the mold as you pour it to ensure it fills evenly. The water will rise around the pudding to create a barrier that will make de-panning easier.
For the non-stick spray method:
- Spray the mold lightly with a neutral-tasting, non-stick spray. If you can get coconut oil in a spray can, even better.
- Pour the tembleque into the greased pan.
How Do I Make Individual Tembleques?

You can make mini tembleques from this recipe; divide the pudding equally between 3-4 ounce molds.
Set them on a sheet pan first to fill individual molds more easily. Pour the hot pudding into the moistened/greased pans and transfer the sheet pan to the fridge. They take only 1 hour to set up when made in individual molds, but I recommend chilling them for at least 3 hours.
How Long Does It Take To Set?

When you’re ready to remove the tembleque from the mold, tilt the pan in a circular motion to loosen the pudding from its sides. Dip the bottom of the pan in hot water for 1-2 minutes. Flip the pan onto a serving plate and let the tembleque stay inverted until you hear a “schloop!” come from the pan. This is an indicator that the tembleque is unmolded.
If you don’t hear a schloop within 3 minutes, flip the pan right-side up and grab a small paring knife or a toothpick. Go around the outside of the pudding with the tip of your knife to loosen it. Don’t forget to loosen the pudding around the inner tube if there is one. Invert the pan once again and wait for the schloop.
If the schloop never happens, you didn’t lubricate the pan well enough. That’s a bummer, but you can always scoop the tembleque from the pan with a wooden spoon and serve it that way.
How Do I Serve Tembleque?

Tembleque is traditionally served cold and should be stored, lightly covered, in the refrigerator until you’re ready to slice it.
Dust the top of the tembleque with ground cinnamon before serving to make it a little fancier. You can also garnish it with slivers of coconut or toasted coconut flakes or a drizzle of chocolate sauce, cajeta, caramel, or guava marmalade. Use a cake spatula or thin knife to slice the tembleque for serving. If you made individual tembleques, serve your guests one each.
Enjoy tembleque with a cup of café con leche (coffee with milk), milk or with coquito during the holidays.
Can I Freeze Tembleque?

You can freeze the tembleque for up to 1 month; here’s how:
- Wrap it well in plastic film after removing it from the pan but before garnishing it with cinnamon. I prefer to unmold it into a freezer-safe container with a lid and then wrap it in plastic.
- Freeze it for up to 1 month.
- Thaw the frozen pudding in the fridge overnight. Some liquid may seep out after thawing but you can use a paper towel to blot it up.
- Garnish and serve as desired.
How Can I Switch Things Up?

To switch up the flavor of tembleque:
- Flavor it with cinnamon sticks, omitting the other spices and orange peel.
- Replace the orange peel with lime zest or lemon peel.
- Use almond, coffee, orange, or rum extract instead of vanilla.
I prefer the classic flavors of tembleque, but it’s fun to experiment.
What Other Puerto Rican Desserts Are Served During The Holidays?

Puerto Rican desserts that are served during the holidays are:
- Arroz con Dulce (Coconut Rice Pudding with Raisins)
- Flan (Puerto Rican-style Egg Custard)
- Mantecaditos (Almond Thumbprint Cookies)
Tembleque is one of the gems of Puerto Rican cuisine. This dessert is a great recipe for every holiday, not just Easter or Christmas. Its warmly-spiced, coconutty creaminess conjures many good memories for Puerto Ricans throughout the diaspora. It’s a hit for coconut lovers and those who aren’t, so I hope you’ll add it to your “to-make” list this year. Let me know what you think when you try it, and don’t forget to tag me on Instagram or Facebook if you make it.
Tembleque (Coconut Pudding)
at Sense & EdibilityEquipment
- 3 or 4-quart saucier
- whisk
- 10 to 12-cup bundt pan or mold
Ingredients
- 4 cups fresh coconut milk (or canned), separated
- 2 3-inch orange peels (from 1 medium navel orange)
- 1 large cinnamon stick (or 2 3-inch long cinnamon sticks)
- 2 1/4-inch thick ginger slices
- 1 star anise
- 1/2 teaspoon whole cloves
- 1/8 teaspoon ground nutmeg
- 1/8 teaspoon kosher salt optional
- 1 cup granulated sugar
- 1/2 cup cornstarch
- 1 tablespoon vanilla extract
Optional Garnishes
- ground cinnamon
- coconut flakes or slivers
Instructions
Moisten the Mold
- Add 1 1/2 tablespoons of water to the mold that will hold your tembleque. Move the water around in the mold to moisten it making sure to get the center tube if your pan has one. Once you've wet the inside of the mold, leave the excess water to pool at the bottom of the mold and set it aside.Alternatively, spray your mold with a neutral-tasting, non-stick cooking spray (coconut oil is recommended) and set aside.
Infuse the Coconut Milk
- Pour 3 cups of the coconut milk into a 3 or 4-quart saucier. To the coconut milk in the pot, add the orange peel, the cinnamon stick, ginger slices, star anise, whole cloves, nutmeg, and salt.
- Bring this mixture up to a simmer over medium-high heat. The fat solids in the coconut will begin to separate a bit, which will make the liquid look curdled. That's totally normal. Allow the coconut milk to simmer for a full 2 minutes. If it starts to boil, reduce the heat to medium-low.
- Stir the coconut milk once or twice during that 2-minute simmer, then turn the stove off. Use a whisk to stir in the sugar into the coconut mixture, then allow the spices to steep in the hot coconut milk for 5 minutes.
Make the Slurry
- While the spices steep in the coconut milk, make the cornstarch slurry.Add the remaining cup of coconut milk to the cornstarch in a bowl in a steady trickle, whisking constantly as you pour the coconut milk into the cornstarch to avoid clumps from forming.
Thicken the Coconut Mixture
- Use a slotted spoon or a small strainer to remove the whole spices from the coconut milk in the pot. Turn the stove on to medium heat.
- Add the cornstarch slurry to the coconut milk in a slow, steady trickle, stirring constantly. Once all the slurry has been stirred in, allow the tembleque to come up to steaming. Continue stirring constantly, paying close attention to the sides, which heat up faster. Incorporate the slurry from the outside of the pan into the center.
- After about 1 1/2-2 minutes, the tembleque will thicken to the point where it resembles mayonnaise. Remove the pot from the stove, and stir in the vanilla extract. Continue stirring for 30 seconds to cool the pudding slightly.
Pan the Tembleque and Chill
- Pour the hot tembleque into the moistened/greased mold, pouring around the mold to ensure it's added in an even layer. The water will rise up around the pudding to create a barrier that will make de-panning easier. Greased pans will not have rising water.
- Set the uncovered pan into the fridge and allow it to chill and set up completely, or anywhere from 2-4 hours. After 2 hours, or when it's no longer emitting heat, you can cover it with plastic wrap.
- When you're ready to remove the tembleque from the mold, tilt the pan in a circular motion to loosen the pudding from its sides. Dip the bottom of the pan in hot water for 1-2 minutes.Leave the tembleque inverted until you hear a "schloop!" come from the pan. That's how you know your tembleque is unmolded.
- Garnish the tembleque with a sprinkle of ground cinnamon and slivers of coconut. Serve chilled.
Notes
- Use canned coconut milk instead of fresh coconut milk.
- Use cinnamon sticks only (omit the other spices and orange peel).
- Replace the orange peel with lime or lemon peel.
- You can increase the sugar to 1 1/4 cup if you like a very sweet tembleque.
- You can thicken tembleque replacing the cornstarch with arrowroot powder using the same measurement called for. The biggest downside to using arrowroot is that it doesn't hold for extended periods.
- Tapioca flour (cassava or yuca flour) is a better option for a replacement thickener. Double the amount to 1 cup of tapioca flour to use in this recipe. Tapioca flour holds considerably well and also freezes well.
- Use almond, coffee, orange, or rum extract instead of vanilla extract.
- 1/2 teaspoon ground cinnamon
- 1/4 teaspoon ground ginger
- 1/8 teaspoon ground cloves
- pinch of star anise powder
- pinch of ground nutmeg
- If the tembleque is too thin after you add the slurry, allow it to simmer for 30 seconds to a minute longer. If it's not at all thick, make more slurry with 1 tablespoon of cornstarch stirred into 1 tablespoon of cold water. Add it the same way as before and see if that thickens it up.
- Metal pans are ideal for making tembleque because they are great conductors, so the pudding chills faster and more evenly.
- A flexible silicone mold can be used, but it may cause you to break the tembleque when you remove it from the mold.
- Don't use a mold that's super intricate in it's design. The tembleque is more likely to get stuck in a pan with a lot of details.
- Tembleque only takes 2 hours to set up enough to unmold, but chilling it for at least 4 hours is recommended.
- If you don't hear a schloop within 3 minutes, flip the pan right-side up and go around the outside of the pudding and where the tube is with the tip of a paring knife or toothpick to loosen it. Invert the pan once again and wait for the schloop.
- If the schloop never happens, it means that you didn't moisten the pan well enough. So you will have to scoop the tembleque from the pan with a spoon to serve it.
- Tembleque is always dusted in ground cinnamon before serving. You can also garnish it with slivers of coconut or with toasted coconut flakes or a drizzle of chocolate sauce, cajeta, caramel, or smooth guava paste.
- Set 3 or 4-ounce molds on a sheet pan.
- Pour the hot pudding into the moistened mold and transfer the sheet pan with the molds into the fridge.
- Chill the tembleque for at least 3 hours before unmolding.
- After unmolding and before garnishing it with cinnamon, flip it out of the pan and into a freezer-safe container that has a lid, then wrap the container in plastic.
- Freeze the tembleque for up to 1 month.
- Thaw the frozen pudding in the fridge overnight. Some liquid may seep out after thawing. Just use a paper towel to blot it up.
- Garnish and serve as desired.


I was so intrigued by this recipe and I had all the ingredients so I made it and it was amazing! Thank you for the very detailed and thorough instructions!
I’m so glad you liked it, Colleen!
Hello Jello! What a fun dessert. I would make it all year round too. So many great tips to help this pudding turn out, especially the one where you add water to the mold for easier de-panning.
I’m so glad you found it helpful, Bernice!
Oh my gosh! this looks so good! the pan you used is sooo pretty!! I need to get one of those and then make this
It is absolutely delicious!! I love the combination of coconut and cinnamon!
Yes, it’s a great combination of flavors.
First of all this tembleque was so pretty and these flavors are so fresh for the season too! LIke a snowflake.
Yes to all of that, Jen! I’m so glad you like it.
This was such an amazing dessert. What delicious flavors. I never heard of tembleque and now I love it!
I’m so glad to know you enjoyed it, Amber!