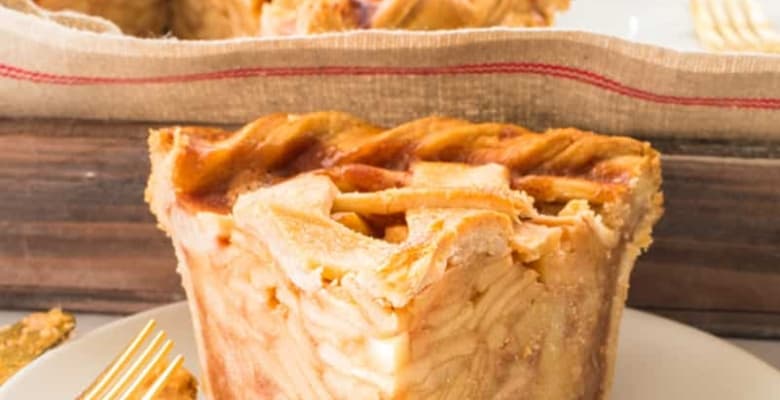
My Apple Cinnamon Pie with Lattice Crust is an easy apple pie recipe made with a homemade apple pie filling spiced with a homemade apple pie spice blend and wrapped in a flaky crust. This is such a great apple pie recipe that it almost wrapped me in a lawsuit with a former manager of mine. Long story short, the manager of an ice cream shop I worked at believed this (and all of my pie recipes) belonged to him and ended up losing all of them when I left to join the Army. Pastry chefs are petty, and he found out the hard way. But, now you can have the best apple pie recipe he always wanted for free.
*This recipe was originally published in November 2018. I’ve updated the article, the images and added weight measurements to the recipe.*

What Is Apple Cinnamon Pie?
Apples come from Central Asia. English settlers brought their pie dough crusts to the New World, and, somehow, apple pies became known as the national dessert of the United States. Colonization at its finest, folks.
However, in the broader sense, pies date back to ancient Greek and Roman times. Pies are just foodstuffs that are baked inside of a pastry. The Greeks and Romans have been doing that long before the US was a twinkle in King George’s money-grabbing eye. However, the pies we are most familiar with did begin in England. During the Middle Ages, most pies were savory and mincemeat pies.
Here, though, we as a nation have perfected the sweet pie. Cherry, pumpkin, and sweet potato pies are American, but none more so than apple.
What Are The Ingredients In An Apple Cinnamon Pie?

The ingredients you need for a cinnamon apple pie are brown sugar, tart apples, pie dough, unsalted butter, cornstarch, apple pie spice blend (or cinnamon, nutmeg, and ginger), kosher salt, lemon juice, and water.
Additionally, you need a 9 or 10-inch pie pan. For a deep dish apple pie, use the 9-inch pie pan. I recommend using a metal pie tin for baking pies because they conduct heat more evenly, but ceramic or glass (or aluminum if you plan to freeze it) will also work. You also need a rolling pin, a sharp pizza cutter (or pastry wheel), and a 4-quart pot.
What Are The Best Apples for Pie-Making?
Granny Smith apples are the best apples for pie-making. They have a firm, tart flesh that gives the classic flavor contrast to this homemade filling. Alternative apples for pie-making are Braeburn, Honey Crisp, Pink Lady, or Jonagold. They are the sweetest I would use in this recipe, though.
Avoid making your cinnamon apple pie filling with Golden Delicious, McIntosh, or Red Delicious Apples. These apple varieties break down a bit too much for the baking time of this pie, which will cause the filling to be nothing more than mushy apples. They are also too sweet for this recipe. Even if you are a fan of super-sweet desserts, I wouldn’t recommend using them in this recipe because the final product will be cloyingly sweet.
Use a vegetable peeler or a sharp paring knife to peel the apples. I make my apple cinnamon pie with 9 large apples because I prefer a tall pie, but you can reduce it to 8. Cut the apples into quarters, then cut the quarters into 1/8-inch thick slices.
What Spices Are In The Apple Cinnamon Pie Filling?

An Apple Pie Spice Blend is the best way to add flavor to your apple pie filling.
Melt the first quantity of unsalted butter over medium-high heat in a wide, shallow pan.
Add the sliced apples and sauté them in the butter for 2 1/2 minutes. Sprinkle in the apple pie spice blend and kosher salt. You can also omit the apple pie spice and use individual spices, like ground cinnamon, ginger, and nutmeg, instead. I prefer my spice blend because it contains more cinnamon, as well as allspice, cardamom, cloves, ginger, mace, and nutmeg.
Add the lemon juice after stirring the spice blend and salt into the apple mixture.
Does Brown Sugar Taste Better Than White In Apple Pies?

The molasses flavor of brown sugar adds caramel flavor to apple pie, so it tastes much better than plain white sugar.
Add the brown sugar to the pot once steam begins rising from the spiced apples. Reduce the heat to medium, then stir the sugar into the apples. Stir to encourage the sugar crystals to melt and combine with the apple and lemon juices. Cook the apples for 3-4 minutes, stirring frequently. Make the cornstarch slurry, which will thicken the filling while you wait for the syrup to develop.
How Is The Filling Thickened?

Add the cornstarch to a small mixing bowl. Whisk in a little water until the mixture is smooth, runny, and resembles milk. This is a slurry.
A slurry thickens the cinnamon apple pie filling. Without it, the apples will fall to hell when you slice your pie, and the liquid will make the bottom crust soggy. You don’t have to use water to make the slurry. You can use apple cider, apple juice, or even more lemon juice (but that would make it pretty tart). Avoid using liquids like milk or cream to make a slurry. They’ll curdle instead of creating a smooth, glossy glaze.
Soon, a puddle of sugar liquid will form in the bottom of the pot of apples and begin to simmer. Use your spoon to create a well in the middle of the apples. Pour the cornstarch slurry into the center of that well, stirring constantly. Use your spoon to stir the apples into the thickened mixture that develops in the pot.
Within a minute or two, the slurry will thicken the pan’s juices. Use your spoon to fold the apples into the glaze to ensure they are fully coated. Continue cooking and stirring the apples until the glaze looks thick; think corn syrup.
How Does Pre-Cooking The Apples Make A Better Pie?

Par-cooking apples before baking the pie creates a thick glaze. We aren’t able to do that unless we heat the cornstarch slurry to the boiling point. We could do it the old-school way and toss our apples and spices in flour in a large mixing bowl, but that’s a hit-or-miss technique. If you have the sort of luck I do, you’ll get super dry apples and end up with a filling that tastes like flour. Instead, this glaze ensures we have the best filling for our apple cinnamon pie.
Briefly cooking the apples before adding them to the pie crust also reduces the pie’s baking time. Adding raw apples to the pie crust adds a half-hour to our baking time.
Add the remaining butter to the apples in the pot once the glaze forms. This technique of finishing sauces or dishes with pats of butter is called mounting. It produces a velvety sauce with minimal effort. Just use your spoon to rapidly stir the butter into the hot glaze. As the filling cools, this butter will also keep the filling from looking crusty.
Can I Fill The Pie Dough Right Away?
It’s best to allow your apple filling (or any cooked filling) to cool completely and as quickly as possible. The latter is because you don’t want the filling to set up too much before it goes into the pie. The former is because you don’t want to begin softening the butter in your pie dough. The residual heat from freshly cooked fillings causes buttery pie crusts to melt. That results in a soggy, gummy bottom crust.
Set the pan filled with the apple cinnamon filling into an ice bath in a large bowl to cool the filling quickly. The ice water should reach halfway up the sides of the apple filling pan. Stirring the filling frequently to redistribute some heat helps it cool faster. Proceed with filling the pie shell once the filling reaches room temperature.
Can I Make The Apple Cinnamon Filling Ahead?
You can make the apple cinnamon pie filling up to two days ahead and store it in a covered container in the fridge. The cold air will firm the butter in the filling, so you must stir it well before using it.
Can I Freeze The Filling?
To freeze apple cinnamon pie filling:
- Allow the pie filling to cool completely.
- Transfer it to a freezer-safe container and freeze it for up to two months.
- Thaw the filling overnight in the fridge, then stir it well before filling the pie dough with it.
What Kind Of Dough Do I Need For This Apple Cinnamon Pie?

My Flaky Pie Dough is the best pie dough to use for apple cinnamon pie. You can also use a store-bought crust for this recipe.
Roll out your disc of pie dough into a 13-inch circle on a lightly floured surface. If baking in a 10-inch pan, roll it out to 14-inches. Make sure the circle of pie dough is rolled evenly and fairly thin. It shouldn’t be any thicker than 1/8 inch. The best way to achieve this is to roll from the center of the disc out in even strokes. Turn your disc as you roll to make sure it doesn’t have hills and valleys.
Metal pie tins (plates) are the best conductors of heat, and they do so evenly, making them the best pans to bake pies in. Ceramic and glass pie dishes work, too. If you plan to freeze your pies for the holidays or for last-minute entertaining, assemble and bake your pies in disposable aluminum pie tins. That way, you can have your everyday pie tin freed up.
Place the rolling pin on the far edge of the circle. Pinch the circle’s rim to the rolling pin with your index fingers and roll back to lift it onto it. Roll the entire disc of dough onto the rolling pin, then unroll it over your pie plate. Use your knuckles to press the pie dough gently into the corners and bottom of the pie plate. This will keep the dough’s sides and edges from shrinking as the pie bakes.
Pour the apple mixture into the dough-lined pan. Be sure to use the back of your spoon to press the filling down, or you’ll have air pockets in your baked pie.
Do I Have To Top It With A Lattice Crust?

A lattice top is a decorative top crust for pies, but it does have some practical uses. The openings in a lattice top vents the pie to prevent the dough from splitting as the steam rises from the filling.
Roll out your second disc of dough into a 15-inch circle 1/8-inch thick. If baking a 10-inch pie, roll it out to 16 inches. Use a pastry wheel (or a pizza cutter) to cut out 18 strips of dough, each 3/4-inch (about 1 cm) wide. It’s always better to have more strips than not enough.
- Use a pencil to mark the circumference of the pie plate on the underside of parchment paper. Use the top rim as a guide, not the bottom (which is smaller).
- Flip the paper over after you’ve marked it. Starting in the middle of the circle, place strips 3/4-inch apart, ensuring they’re spaced evenly. Fold back every other strip to the middle of the circle. It doesn’t matter where you start. Just make sure every other one is folded back halfway. Pay attention to the strips of dough that are straight. Those will be folded back on the next go-round.
- Lay a strip of dough across the pie, starting in the center. Straighten the strips of dough you folded back. Now, fold back the strips of dough that you left straight. Lay another strip of dough 3/4-inch from the first one (that you laid across). Unfold the strips of dough to return them to their straight positions.
- Fold back the strips you folded the first time and repeat. Continue this pattern until the top half of the circle is weaved, then do the bottom half.
Carefully slide the paper with the latticed dough onto a sheetpan or pizza pan and refrigerate the dough for 15 minutes.
How Do I Attach The Pie Crusts?

An egg wash seals the pie crust together. Egg washes also give your pie a glossy finish when they’re brushed on the lattice’s surface and the pie’s rim.
Whisk together the egg yolk and cold water in a small mixing bowl. Brush a thin layer of the beaten egg wash onto the rim of the bottom pie crust.
Remove the chilled lattice top from the fridge and flip it onto the filled bottom pie shell quickly but carefully. Press the lattice to the rim of the bottom shell to seal it. Once sealed, use a sharp knife or a pair of kitchen shears to trim off the dough touching your counters. Leave the rest of the dough to form the crust.
Brush a layer of the egg wash on top of the lattice crust. Fold the excess strips of dough up and to an angle to create the crust. I’m a sucker for pie crust, so I love to use up as much of the dough as possible. But you can trim anything beneath the rim of the pie tin. Use cookie cutters to cut out cute shapes from the scraps of pie dough and attach them to the top of the lattice.

Once the strips are folded, crimp the edges by grabbing the dough between your thumb and forefinger. Twist counterclockwise to flute the edge. Continue all the way around the pie until the crust is formed. You can also go old-school and press the tines of a fork onto the edge to create a decorative design.
Chill the pie in the fridge for at least 30 minutes to firm up the butter in the pie crust and keep it from falling as it bakes in the oven.
Take this time to preheat your oven to 400°F (200°C).
Can I Freeze The Pie Before Baking?
To freeze an assembled, unbaked pie, freeze it uncovered for 1 hour. After the pie is frozen, wrap it in two layers of plastic wrap and freeze it for up to 3 months.
Thaw it in the fridge overnight or bake it from frozen after brushing the egg wash over it again. If you’re baking from frozen, you’ll need to add 30 minutes to the baking time.
How Long Does It Take To Bake An Apple Cinnamon Pie?

Remove it from the fridge after 30 minutes and brush another layer of the egg wash over the surface of the pie. If you’re baking in a glass or ceramic pie dish, let the pie plate warm up for 5-10 minutes on the counter, or the temperature change could cause the dish to shatter. Bake the apple cinnamon pie in the oven for 20 minutes at 400°F (200°C).
Reduce the oven temperature to 350°F (177°C) after 20 minutes of baking and continue baking it for 40-45 minutes. Rotate the pie after a half hour to make sure the pie develops a golden-brown crust. If the pie crust is browning too much, lightly place a piece of aluminum foil or a pie shield over the top to keep it from browning further. You want the crust to be golden brown and the pie filling to bubble through the lattice. Those visual cues and the two different baking temps will ensure a perfectly baked pie.
How Long Does The Pie Need To Cool Down After Baking?

Allow the apple cinnamon pie to cool for at least 20 minutes after removing it from the oven.
This cooling period allows the filling to set up and allows you to cut cleaner slices from the pie. You can also allow it to cool completely before cutting it.
How Do I Serve Apple Cinnamon Pie?

The best way to serve pie is topped with vanilla ice cream or à la mode. I prefer frozen custard myself, so here are a few I recommend:
You can also serve your slice of apple pie topped with whipped cream or by itself.
How Do I Store Leftovers?

To freeze a baked apple pie:
- Bake and cool the pie completely.
- Wrap it in a layer of plastic wrap, followed by a layer of foil, and freeze it for 2 months.
- Thaw it at room temperature, uncovered, or in the fridge, covered. You can warm it in a 200°F (93°C) oven for 20 minutes to fake like you just made it if need be.
My Apple Cinnamon Pie with Lattice Crust turns the classic apple pie into a perfect apple pie with its warm spices and flaky pie crust. Apple desserts don’t come any better than this, and during this time of year, when the apples are at their tastiest, you will want to make this recipe again and again. Save this pie recipe to your dessert board for easy finding, and make it after your next apple picking trip. Don’t forget to let me know how you like it in the comments section, too!
Apple Cinnamon Pie with Lattice Crust
at Sense & EdibilityEquipment
- 9-inch pie plate
- rolling pin
- pastry wheel (or pizza cutter)
- pastry brush
Ingredients
Apple Cinnamon Filling
- 8 (1 3/4 kilograms) Granny Smith apples peeled, cored, quartered, and sliced 1/4-inch thick
- 1/2 cup (1 stick or 113 grams) unsalted butter divided
- 2 tablespoons (10 grams) Apple Pie Spice Blend *see notes for individual spice measurements
- 1/2 teaspoon (3 grams) kosher salt optional
- 2 1/2 tablespoons (37 milliliters) lemon juice from 1 large lemon
- 1 cup, packed (230 grams) brown sugar
- 4 tablespoons (35 grams) cornstarch
- 1/4 cup (60 milliliters) cold water
- 2 8-ounce (250 grams) portions flaky pie dough (or store bought)
Egg Wash
- 1 large egg yolk
- 1 tablespoon (15 milliliters water (cold)
Instructions
Prepare the Apple Cinnamon Filling
- In a wide, shallow, 6-quart sauté pan, melt 4 tablespoons of the unsalted butter over medium-high heat.Once the butter has melted, add the apple slices and sauté them in the butter for 2 1/2 minutes.
- Sprinkle the Apple Pie Spice Blend and kosher salt in. Stir the spice blend and salt into the apple mixture, then add the lemon juice.
- Once steam begins rising from the spiced apples, stir the brown sugar to the pot. Reduce the heat to medium. Stirring frequently, cook the apples for 3-4 minutes.
- While you're waiting for the syrup to form, make the slurry.Add the cornstarch to a small mixing bowl. Whisk in the cold water until the mixture is smooth and runny.
- Soon, a puddle of sugar-liquid will form in the bottom of the pot of apples and begin to simmer. Use your spoon to create a well in the middle of the apples. Whisking constantly, pour the cornstarch slurry into the center of the apples. Once the slurry is added, use your spoon to stir the apples into the mixture you've just created.
- Within a minute or two, the slurry will begin to thicken the juices in the pan. Use your spoon to fold the apples into the glaze to ensure they are fully coated. Continue cooking and stirring the apples into the glaze until the glaze looks thick; think corn syrup. Once the glaze is thick, add the remaining butter to the apples in the pot. Stir the butter rapidly into the hot glaze.
Cool the Filling, Then Fill the Bottom Pie Shell
- Set the pan filled with the apple cinnamon filling into a larger pan filled with ice water that reaches halfway up the sides of the apple filling pan. Cool the apple cinnamon filling in this manner, stirring the filling frequently to redistribute some of the heat. Once cool, you can proceed with filling the pie shell.
- Roll out one disc of pie dough into a 13-inch circle. If you're baking in a 10-inch pan, roll it out to 14-inches. Make sure the circle of pie dough is rolled evenly and no thicker than 1/8-inch. Lay the circle of dough into your pie tin. Once the bottom circle of dough is in the pie tin, use your knuckles to press it gently into the corners and bottom of the pie plate. This will keep the sides and edges of the dough from shrinking down as the pie bakes.
- Pour the cool apple cinnamon filling into the bottom shell. Use the back of your spoon to press the filling down to prevent any air pockets in your baked pie.
Weave the Lattice Top
- Roll out the second disc of dough into a 15-inch circle 1/8-inch thick. If you're baking a 10-inch pie, roll it out to 16-inches. Use your pastry wheel (or a pizza cutter) to cut out 18 strips of dough, each 3/4-inch (about 1 cm) wide.
- Set the pie plate onto a piece of parchment paper and use a pencil to mark the circumference of the top of the pie plate. Once you have your circle marked, flip the paper over.
- Starting in the middle of the circle, place strips 3/4-inch apart. Make sure they're evenly spaced. Fold back every other strip to the middle of the circle. Pay attention to the strips of dough that are straight. Those will be folded back on the next step.
- Lay a strip of dough across the pie, starting in the center. Straighten the strips of dough you folded back. Now, fold back the strips of dough that you left straight.
- Lay another strip of dough 3/4-inch from the first one (that you laid across). Unfold the strips of dough to return them to their straight positions. Fold back the strips you folded the first time and repeat.
- Continue this pattern until the top half of the circle is weaved, then do the bottom half.
- Carefully slide the paper with the latticed dough onto a sheetpan or pizza pan and refrigerate the dough for 15 minutes. This will firm up the butter in the dough and make transferring it easier.
Prepare the Egg Wash
- In a small mixing bowl, whisk together the egg yolk and cold water. Once the mixture is smooth, brush a thin layer of the egg wash onto the rim of the bottom pie crust.
- Remove the chilled lattice top from the fridge and quickly, but carefully, flip it onto the filled, bottom pie shell. Press the lattice to the rim of the bottom shell to seal it. Once sealed, use a sharp knife or a pair of kitchen shears to trim off the dough that's touching your counters. Leave the rest of the hanging dough for forming the crust.
- Brush a layer of the egg wash on top of the lattice crust. Fold the excess strips of dough up and to an angle to create the crust. Once the strips are folded, crimp the edges by grabbing the dough between your thumb and forefinger and twisting counter-clockwise or by pressing the tines of a fork onto the edge.
Cover the Bottom Half of the Pie and Chill for a Sharp Crust
- Chill the pie in the fridge for at least 30 minutes. This is the best way to ensure your crust stays nice and pretty. While the pie chills, preheat your oven to 400°F (204°C).
Bake the Pie
- After 30 minutes, remove the pie from the fridge and brush another layer of the egg wash over the surface of the pie. If you're baking in a glass or ceramic pie dish, allow the pie plate to warm up for five minutes on the counter.* After five minutes, put the pie into the oven and bake it for 20 minutes.
- After 20 minutes, reduce the oven temperature to 350°F (177°C) and bake it for an additional 40-45 minutes. Rotate the pie after a half hour to make sure the pie browns evenly. If you find that the pie is browning too much, place a piece of foil over it (lightly) to cover it.
- When fully baked, the crust should be golden brown and the pie filling will bubble through the lattice. Once the pie is done baking, remove the pan from the oven. Allow the pie to cool for at least 20 minutes before cutting and serving.
Notes
Swaps and Substitutions:
- Replace the Granny Smith apples with Braeburn, Honey Crisp, Pink Lady, or Jonagold. But, avoid Golden Delicious and McIntosh Apples. Both will become too mushy in this recipe.
- You can omit the Apple Pie Spice Blend and use 1 1/2 tablespoons (8 grams) ground cinnamon, 1 teaspoon (3 grams) ground ginger, and 3/4 teaspoon (4 grams) ground nutmeg.
Tips and Techniques:
- A metal pie tin bakes the best pies, but ceramic or glass (or aluminum if you plan to freeze it) will also work.
- Cool the filling completely, or the residual heat from it will cause your bottom crust to become soggy and gummy.
- *Putting an ice-cold pie plate (especially a ceramic one) into a raging hot oven could cause it to shatter.
Make-Ahead Instructions:
- Make-Ahead Apple Cinnamon Pie Filling:
- Prepare it as instructed and store it in a covered container in the fridge.
- Store the filling for up to 2 days.
- The cold air will firm the butter in the filling up quite a bit, so you need to stir it well before using it.
Storage Instructions:
- Store leftover apple cinnamon pie at room temperature, covered by a cake dome or cloche. You can also store it in a container in the fridge.
- Reheat slices of pie on high for 15 seconds in the microwave for a warm, freshly-baked flavor.
- Enjoy this pie within 4 days of baking for the best taste.
Freezing Instructions:
- To freeze the Prepared Apple Cinnamon Filling:
- Allow it to cool completely.
- Transfer it to a freezer-safe container and freeze it for up to two months.
- You can thaw it overnight in the fridge.
- Stir well before using it to fill your pie.
- Freeze Unbaked Apple Cinnamon Pie:
- Refrigerate the lattice-topped pie to firm up the dough.
- Wrap the pie in two layers layers of plastic film and freeze it for up to 3 months.
- Thaw the frozen pie in the fridge overnight or bake it from frozen after brushing the egg wash over it again. You'll need to add an additional 30 minutes at 350°F (177°C) to the baking time if you're baking from frozen.
- To freeze the Baked Apple Cinnamon Pie:
- Bake and cool the pie completely.
- Wrap it in a layer of plastic wrap, followed by a layer of foil, and freeze it for 2 months.
- Thaw it at room temperature, uncovered, or in the fridge, covered.
- You can warm it in a 200°F (93°C) oven for 20 minutes for a freshly baked taste.


Hello! I’ve just started getting into baking. I want to make this for a friend at work and was just wanting to clarify about the pastry. Do i make and pre bake the shell before adding the filling?
Thanks!
Hi Laura, sorry for the confusion. You don’t need to pre-bake the shell but you DO need to let the filling cool to room-temperature or chill it. This will prevent the hot filling from making the bottom crust gummy. Be sure bake it at that higher heat and reduce the temperature after 20 minutes to ensure the bottom crust bakes properly. If you have a metal pie tin, I really encourage you to bake it in that since metal pans conduct heat better. If not, that’s okay, just be sure to do that step-down baking move in the instructions. Enjoy!
Amazing pie!!!! I made this yesterday and it was delicious. I will definitely make this again for the holidays.
I’m so glad you liked it, Martha!
Perfect apple pie! There were literally no crumbs left. I’m definitely making this again for Thanksgiving.
Thank you, Jazz!