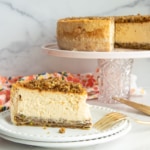
If you look forward to airplane coffee with a package of Biscoff® cookies or are a coffee lover or cheesecake fanatic, this Espresso Cheesecake with Biscoff® Crust is about to become your favorite dessert. A boldly flavored, creamy espresso cheesecake is baked in a buttery, crisp crust made with Biscoff® cookies. It’s a nod to my favorite coffee break combination of speculoos cookies and espresso. This unique twist will surely become a hit with your family and friends, especially if they’re coffee lovers like me.
*I originally published this recipe in March 2018. It’s been updated to include metric measurements, new photos, and more concise instructions.*

What Are Biscoff® Cookies?
Lotus Biscoff® cookies are a speculoos cookie with all-natural ingredients with a caramelized flavor and crunchy texture. These Belgian cookies are made with brown sugar, butter, flour, and a blend of spices—the most prominent spice being cinnamon. Biscoff® cookies are now popular worldwide and are most often served with coffee or espresso, as the two flavors complement each other perfectly. If you’ve ever patronized a European café or flown on a transatlantic flight to Europe, you’ve probably enjoyed Biscoff® cookies this way.
Biscoff® cookies have gained popularity worldwide and are also used in various dessert recipes, such as pie bases, as an ice cream mix-in, and, as we have here, cheesecake crusts.
What Do I Need To Make The Biscoff® Crust?

A Biscoff® only requires two ingredients: Biscoff® cookie crumbs and unsalted butter.
You can replace the Biscoff® cookies in this recipe with crushed graham crackers, vanilla wafers, or crunchy oatmeal cookies.

Use your hand or a rubber spatula to stir the melted butter and cookie crumbs together. Grab a handful of the crumb mixture and squeeze it. If the crust holds together, press it into a 9-inch springform pan using a measuring cup or flat-bottomed glass.
If the cheesecake crust crumbles apart after you release your fist, add more melted butter, 1 tablespoon at a time, until it holds together. Add more Biscoff® crumbs if the mixture oozes butter between your fingers.
Bake the cheesecake crust in a 350°F (180°C) oven for 10 minutes. After 10 minutes, remove the cheesecake pan from the oven and allow it to cool to room temperature. Once cool, wrap the bottom and sides of the pan in a double layer of aluminum foil.
What Ingredients Do I Need For The Espresso Cheesecake?

To make the espresso cheesecake, you’ll need cream cheese, granulated sugar, kosher salt, large eggs, instant espresso powder, hot water, vanilla extract, and cornstarch.
You also need an electric hand mixer and a rubber spatula. You can make the espresso cheesecake batter in a stand mixer if that’s what you have. Just use the paddle attachment for mixing the batter.
Heat 5 cups (about 1 liter) of water in a saucepan over medium-high heat. This is for the water bath in which you’ll bake the cheesecake.
Which Powdered Espresso Is Best For Baking?

Begin by dissolving the instant espresso powder in a small amount of very hot water and the vanilla extract. Use a whisk or spoon to stir the espresso in until completely dissolved. It may take more or less hot water depending on the brand of instant espresso you’re using. Set the espresso aside while you begin the rest of the batter.
I prefer Vietnamese espresso for this espresso cheesecake. It has a floral, less acidic flavor than Cuban or European-style espresso. If you prefer the flavor of Cuban or European, use your favorite brand. Use the least amount of hot water to dissolve the espresso powder.
How Do I Avoid Lumps In My Cheesecake?

Creating a smooth cheesecake batter begins with room-temperature cream cheese. I recommend leaving the cream cheese out on the counter for at least 12 hours before mixing the batter. This allows the fat in the cheesecake to soften, producing a velvety smooth batter.
Blend the cream cheese, sugar, and salt in a glass mixing bowl with an electric mixer on low speed. Once the mixture is smooth, stop the mixer and use a rubber spatula to scrape down the sides of the bowl and the beaters.
Next, add the espresso mixture to the cheese and sugar mixture. Blend these in for 30 seconds to 1 minute on low speed.

Add the room-temperature eggs to the batter, one at a time. Blend the eggs into the batter at low speed, stopping to scrape down the bowl and beaters after each egg is incorporated.
After the last egg is added, increase the mixing speed to medium and blend the mixture for 1 minute. Stop the mixer and scrape down the bowl and beaters once more.
What Does The Cornstarch Do?

Adding starch to your cheesecake batter gives the baked cheesecake more body or structure. Without it, the final result will be very loose and have a pudding-like consistency. I prefer to add cornstarch to my cheesecake batters because it’s what gives my New York-style cheesecake its body. You can replace the cornstarch with tapioca starch or all-purpose flour.
Finally, add the cornstarch to the cheesecake batter. Blend the cornstarch at low speed for 30-45 seconds. Do not overmix at this stage, or the cheesecake will become gummy.
How Long Do I Have To Bake My Espresso Cheesecake?

Use a rubber spatula to scrape the cheesecake batter into the prepared pan. Set the cheesecake pan into another pan that’s 12 inches or larger. Pour the hot water you boiled earlier into the larger pan, shielding the cheesecake from splashes.
Carefully slide the larger pan into your 350°F (180°C) oven and bake the espresso cheesecake for 1 hour.
How Long Does It Take For Cheesecakes To Set?

A proper cheesecake takes more than 8 hours to set up after baking. Because it is a custard, it needs time to set up, and that’s usually done in stages. Often, cheesecakes fall or develop cracks because they rapidly go from hot ovens to colder environments. Instead of jerking the cheesecake out of the oven after baking, gradually cooling it in the oven gives the internal structure a chance to set up.
After an hour:
- Turn the oven off and prop open its door using a wooden spoon.
- Allow the cheesecake to cool gradually in the vented oven for another hour.
- Once the hour has elapsed, remove the larger pan from the oven.
- Remove the cheesecake pan from the water bath, peel off and discard the foil covering, and allow the cheesecake to cool to room temperature.
Further chilling from the cooling oven to room temperature continues to fortify the structure. Finally, chilling in the fridge for at least 6 hours produces a cheesecake with a creamy, solid interior. Once the pan reaches room temperature, cover it with plastic wrap and put it in the refrigerator to chill for at least 6 hours. I recommend chilling the espresso cheesecake overnight for the best results.
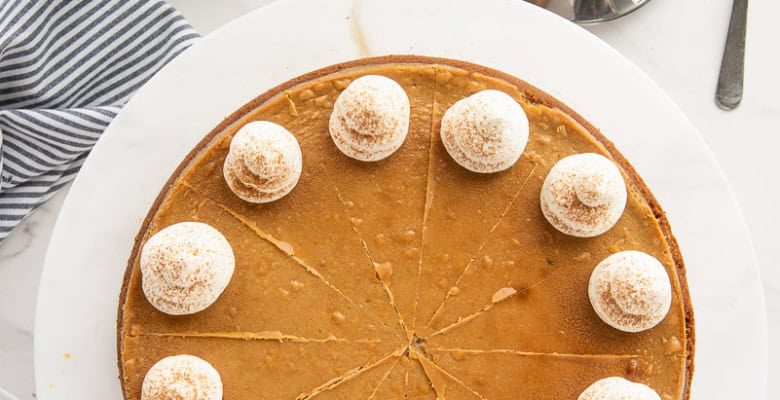
What’s A Good Topping For This Cheesecake?

While you can enjoy this espresso cheesecake as is, I love to top mine simply with whipped cream. It’s a nod to steamed foam in a cappuccino. You can also top this espresso cheesecake with a drizzle of Cajeta or Caramel for give it a caramel macchiato vibe. Topping it with the Chocolate Ganache from this brownie recipe will give it a mocha twist.
If you want to go the whipped cream route, you’ll need heavy cream and granulated sugar.
Add the heavy cream to a chilled bowl and beat at medium-high speed using the whisk attachment for 1 minute. After a minute, sprinkle in the sugar and continue whipping it for 4-5 minutes or until the cream holds stiff peaks when the whisk is lifted from the bowl.
Fill a piping bag, fitted with a 1A tip, with the whipped cream. If you don’t have a piping bag, snip the corner off a freezer storage bag after filling it with the cream. Pipe dollops of whipped cream around the border of the cheesecake. Sprinkle a little ground cinnamon over the border to complete the “coffee” look.
What’s The Best Way To Serve This Espresso Cheesecake With Biscoff Crust?

My obvious answer is: with coffee, however, you can enjoy it with your favorite beverage.
Slice the espresso cheesecake into 10-12 slices and enjoy.
How Do I Store Leftovers?

To prevent a gummy crust from forming on the exposed cheesecake, press a piece of wax or parchment paper against the cut cheesecake.
Store the cheesecake in the fridge when you’re not cutting it. It’s important to keep the cheesecake refrigerated to ensure it’s at its best flavor-wise. You also don’t want to make yourself or anyone else sick.
You can store this espresso cheesecake up to 5 days after baking it. I promise it won’t last that long.
Can I Freeze Cheesecake After Baking?

You can freeze espresso cheesecake before topping it with whipped cream. To freeze it:
- Cool the cheesecake to room temperature. Place the pan in the refrigerator and chill for at least 6 hours.
- Remove the cheesecake from the springform pan and set it on a freezer-safe plate or cake board.
- Wrap the cheesecake in two layers of plastic film and one layer of heavy-duty aluminum foil.
- Freeze for up to 3 months.
- Thaw the cheesecake in the fridge overnight, then garnish and serve.
This decadent twist on coffee and Biscoff® cookies is what coffee lovers dream of. It’s a simple dessert to make but one that garners tons of compliments from everyone who tries it. Save this recipe for easy finding later, and be sure to share it with the coffee lovers in your life.
Espresso Cheesecake with Biscoff Crust
at Sense & EdibilityEquipment
- piping bag with 1A tip (or a plastic freezer bag for piping)
Ingredients
For the Biscoff® Crust
- 1 1/2 8-ounce packages (48 cookies or 370 grams) Biscoff® Cookies crushed to fine crumbs
- 1/3 cup (3/4 stick or 75 grams) unsalted butter melted
For the Espresso Cheesecake
- 3 tablespoons (15 grams) instant espresso powder use less for a milder espresso flavor
- 1 1/2 tablespoons (22 milliliters) hot water use more less to dissolve the espresso
- 1 teaspoon (5 milliliters) vanilla extract
- 4 8 ounce bricks (1.8 kilograms) cream cheese at room temperature
- 1 1/4 cup (225 grams) granulated sugar
- 1/2 teaspoon (3 grams) kosher salt optional
- 4 large eggs at room temperature
- 2 tablespoons (23 grams) cornstarch
For the Whipped Cream Garnish
- 1 cup (250 milliliters) heavy cream
- 1 tablespoon (15 grams) granulated sugar
Instructions
- Heat an oven to 350°F (180°C).
Prepare the Biscoff® Crust
- Bake the cheesecake crust in a 350°F (180°C) oven for 10 minutes. After 10 minutes, remove the cheesecake pan from the oven and allow it to cool to room temperature. Once cool, wrap the bottom and sides of the pan in a double layer of aluminum foil.
Mix the Espresso Cheesecake Batter
- Heat 5 cups (about 1 liter) of water in a saucepan over medium-high heat. This is for the water bath in which you'll bake the cheesecake.
- Dissolve the instant espresso powder in 1 1/2 tablespoons of hot water. Use a whisk or spoon to stir the espresso in until completely dissolved. Set the espresso aside while you begin the rest of the batter.
- Blend the cream cheese, sugar, and salt in a glass mixing bowl with an electric mixer on low speed. Once the mixture is smooth, stop the mixer and use a rubber spatula to scrape down the sides of the bowl and the beaters.
- Next, add the espresso mixture to the cheese and sugar mixture. Blend the mixture in for 30 seconds to 1 minute on low speed.
- Blend the eggs into the batter, on at a time, at low speed, stopping to scrape down the bowl and beaters after each egg is incorporated.After the last egg is added, increase the mixing speed to medium and blend the mixture for 1 minute. Stop the mixer and scrape down the bowl and beaters once more.
- Add the cornstarch to the cheesecake batter. Blend the cornstarch at low speed for 30-45 seconds.
Bake, Then Gradually Cool the Cheesecake
- Scrape the cheesecake batter into the prepared pan. Set the cheesecake pan into another pan that's 12 inches or larger. Pour the hot water you boiled earlier into the larger pan, shielding the cheesecake from splashes.
- Carefully slide the larger pan into your 350°F (180°C) oven and bake the espresso cheesecake for 1 hour.
- Turn the oven off and prop open its door using a wooden spoon. Allow the cheesecake to cool gradually in the vented oven for another hour. Once the hour has elapsed, remove the larger pan from the oven. Remove the cheesecake pan from the water bath, peel off and discard the foil covering, and allow the cheesecake to cool to room temperature.
- Once the pan reaches room temperature, cover it with plastic wrap and put it in the refrigerator to chill for at least 6 hours or overnight (recommended).
Make the Whipped Cream Garnish
- Add the heavy cream to a chilled bowl and beat at medium-high speed using the whisk attachment for 1 minute. After a minute, sprinkle in the sugar and continue whipping it for 4-5 minutes or until the cream holds stiff peaks when the whisk is lifted from the bowl.
- Fill a piping bag, fitted with a 1A tip, with the whipped cream. If you don't have a piping bag, snip the corner off a freezer storage bag after filling it with the cream. Pipe dollops of whipped cream around the border of the cheesecake.
- Sprinkle a little ground cinnamon over the border to complete the "coffee" look.
Serve the Espresso Cheesecake with Biscoff® Crust
- Slice the espresso cheesecake into 10-12 slices and enjoy.
- You can store this espresso cheesecake in the refrigerator up to 5 days after baking it.
Notes
- Replace the Biscoff® cookies with crushed graham crackers, vanilla wafers, or crunchy oatmeal cookies.
- You can replace the cornstarch with tapioca starch or all-purpose flour.
- Instead of whipped cream, top this cheesecake with a drizzle of Cajeta, Caramel, or with Chocolate Ganache from this brownie recipe. You can also serve it plain.
- If the cheesecake crust crumbles apart after you release your fist, add more melted butter, 1 tablespoon at a time, until it holds together. Add more Biscoff® crumbs if the mixture oozes butter between your fingers.
- It may take more or less hot water depending on the brand of instant espresso you're using.
- I recommend leaving the cream cheese out on the counter for at least 12 hours before mixing the batter.
- Do not overmix the batter after adding the cornstarch, or the cheesecake will become gummy.
- Press a piece of wax or parchment paper against the cut cheesecake to prevent a gummy crust from forming on the exposed cheesecake.
- Keep the cheesecake refrigerated to ensure it's at its best flavor-wise and for food safety.
- Cool the cheesecake to room temperature. Place the pan in the refrigerator and chill for at least 6 hours.
- Remove the cheesecake from the springform pan and set it on a freezer-safe plate or cake board. Wrap the cheesecake in two layers of plastic film and one layer of heavy-duty aluminum foil.
- Freeze for up to 3 months.
- Thaw the cheesecake in the fridge overnight, then garnish and serve.


This cake looks soooo yummy, and so worth the effort of making from scratch! I’ll be giving it a try as soon as possible! 🙂
I hope you love it like we did, Emily!
OMG I’m dying for a cheesecake right now! Will definitely have to try your recipe this weekend!
I hope you love it as much as we did, Celeste.
Cheesecakes is my jam! This looks gorgeous and so tasty!
They’re my jam too, Amber! Thanks so much!
Coffee and cheesecake it might be the best combo on the planet,it sounds delicious!
I agree, Mimi! It’s the ultimate dessert!
You manage to take cheesecake to another level of deliciousness!
I try, Paula! Cheesecaking is serious business to me! LOLL
This is the second time I have stumbled across your blog. I absolutely love your work. All of your recipes look delicious! I can’t wait to give them a try.
Thank you, Brittney! That means the world to me.