Pumpkin Cheesecake is a creamy, New York-style custard with fresh pumpkin puree and warm fall spices. Its gingersnap crust adds more depth of flavor with its crunchy spiciness. This is the dessert your holiday table is pining for.
*This post is an update from the original article written in November 2020. Only the article is new.*

What is a Pumpkin Cheesecake?
In its simplest form, cheesecake is a custard of cheese, like cream cheese, Neufchâtel, quark, or ricotta, eggs, and sugar, baked inside a cookie crust until set. Cheesecake is most often served cold. Depending on the region a cheesecake is from, you might find the addition of heavy cream. A New York-style cheesecake often incorporates heavy cream into the batter, making it a rich, dense dessert.
Pumpkin cheesecake is a cheesecake that contains pumpkin puree and spices like allspice, cinnamon, and nutmeg. This recipe adds more flavor by adding a gingersnap crust instead of the common graham cracker crust.
What Are the Ingredients In a Pumpkin Cheesecake?

Pumpkin cheesecake is made with room temperature cream cheese, solid pack pumpkin puree (or homemade), sugar, eggs, ground ginger, allspice, cinnamon, cloves, and nutmeg, or my pumpkin spice blend, kosher salt, cornstarch, heavy cream, lemon zest, and vanilla extract.

To make gingersnap crust for cheesecake, you need crunchy gingersnap cookie crumbs and melted unsalted butter.
You also need a 9-inch springform pan set inside a larger, 12 to 14-inch oven-safe pan for baking the pumpkin cheesecake. A stand or an electric hand mixer makes blending the cheesecake batter easy. You’ll also need a food processor for turning the gingersnap cookies into crumbs.
How Do I Make a Cheesecake Crust?
Most cheesecakes have a crust of some kind. Some are made with sponge cakes, like New York’s Junior’s cheesecakes. There are also crustless cheesecakes. Those should just be called baked custards, but I’m not the pastry police. The key to achieving the perfect crust for your pumpkin cheesecake is using the right ratio of melted butter to cookie crumbs.
Pulse the gingersnap cookies to a fine crumb using the metal blade attachment in your food processor.
Combine the cookie crumbs with the melted butter in a bowl and mix them together. Squeeze the crumb mixture in your hand after mixing it. If the cheesecake crust mixture holds together in a firm clump, it’s ready to use in your cheesecake recipe. On the contrary, if the cheesecake crust falls apart when you release pressure, add 1 to 2 tablespoons of melted butter to bind it together. If the cheesecake crust mixture seeps butter when you squeeze it in your hand, add more gingersnap crumbs to soak up the excess fat.
Can I Replace the Gingersnaps With a Different Cookie?

You can use graham cracker crumbs, Biscoff cookie crumbs, vanilla or chocolate wafers, or animal crackers instead of gingersnap cookies for your cheesecake crust.
Use the bottom of a measuring cup to press your cheesecake crust into a 9″ springform pan. As you press the bottom, press along the side of the pan to create a side crust.
Bake the cheesecake crust in a 350°F (180°C) oven for 10 minutes.
Remove the pan from the oven and allow it to cool to room temperature, but don’t turn the oven off.
Wrap the bottom and sides of the pan in two layers of heavy-duty aluminum foil once it’s cool enough to handle. Wrapping your springform pan in foil prevents water from seeping into the cheesecake pan as it bakes in the water bath.
How Do I Make the Pumpkin Cheesecake Batter?

Bring 6 cups of water in a large pot up to a boil over medium-high heat before starting the cheesecake batter.
Use a whisk to combine the ground cinnamon, nutmeg, ginger, allspice, cloves, kosher salt, and cornstarch in a small bowl. Pumpkin spice blend or chai spice blend are great to replace all of those spices, as well. Cornstarch gives pumpkin cheesecake that fluffy texture and body that are ideal in a cheesecake. You can replace the cornstarch with the same amount of all-purpose flour or leave it out.
In a large mixing bowl, use a hand mixer or a KitchenAid stand mixer with a paddle attachment to blend the cream cheese, sugar, lemon zest, and vanilla bean paste at low speed.

Add the eggs to the bowl, one at a time once you achieve a smooth, well-blended mixture. Scrape down the bowl after each egg is incorporated to ensure the batter is evenly blended.
Mix in the mashed pumpkin and the heavy cream once the eggs are added. Finally, blend in the spice mixture just until incorporated. If you over-mix the batter at this stage, the cornstarch will make the pumpkin cheesecake gummy texture.
Is Baking Cheesecake In a Water Bath Necessary?
Baking cheesecakes in a water bath creates a consistent temperature for the custard to bake in. Without a water bath, or a bain-marie, the pumpkin cheesecake’s temperature will rise and fall with the oven as it clicks on and off to regulate its internal temperature. The oven’s fluctuating temperature is the main cause of cheesecake cracks, which is why baking your cheesecake in a water bath is essential.
How Does It Take To Bake a Pumpkin Cheesecake?
Scrape the pumpkin cheesecake batter into the gingersnap crust.

Next, set the foil-wrapped, filled cheesecake pan into the larger pan. Make sure there’s at least two inches of clearance on the sides of the cheesecake pan so you have enough to pour the hot water into the outer pan without splashing the cheesecake batter. Using a bench scraper or wide spatula as a shield prevents water from splashing onto the cheesecake batter.
Carefully slide the larger pan into the hot oven. It takes 1 hour to bake a pumpkin cheesecake.
How Do I Keep My Cheesecake From Cracking?
Cooling freshly baked cheesecakes gradually in the oven, then on the countertop is great insurance in preventing surface cracks. Since sudden temperature changes, like being removed from a 350°F oven to a 72°F countertop, can cause a cheesecake to crack, it’s best to cool cheesecakes gradually in a vented oven. This gradual cooling of the pumpkin cheesecake allows the structure of the custard to set up slowly.
After the cheesecake is done baking, turn the oven off, then prop open the oven door with a wooden spoon. Allow the cheesecake to cool in the oven for 1 hour. After an hour, remove the cheesecake from the oven and the water bath. Remove the protective foil and allow the pumpkin cheesecake to cool to the touch on the countertop. This second, gradual cooling, acclimates the cheesecake to its surroundings to further strengthen the structure and prevent cracking. It also cools the cheesecake, so you don’t end up with condensation dripping from the plastic covering onto its surface after you wrap it for storage.
Cover the cheesecake pan with plastic wrap and put it into the refrigerator once it’s at room temperature. Chill cheesecakes for at least 6 hours or overnight to allow its structure to set up completely, resulting in perfect slices.
How Do I Top Pumpkin Cheesecake?

This pumpkin cheesecake doesn’t need a topping, but rosettes of whipped cream give it an air of festivity. This step is totally optional.
To make a fall-flavored whipped cream:
- Mix heavy cream and maple extract in a mixing bowl. If you want to switch up the flavor, I recommend vanilla, maple, cinnamon, or pumpkin spice extract.
- Begin whipping the cream at medium speed.
- Once the beaters start to leave ribbons in the cream, start sprinkling in the granulated sugar.
- After adding the sugar, increase the mixer’s speed to high and whip for 2-3 more minutes or until the cream is fluffy and stiff.
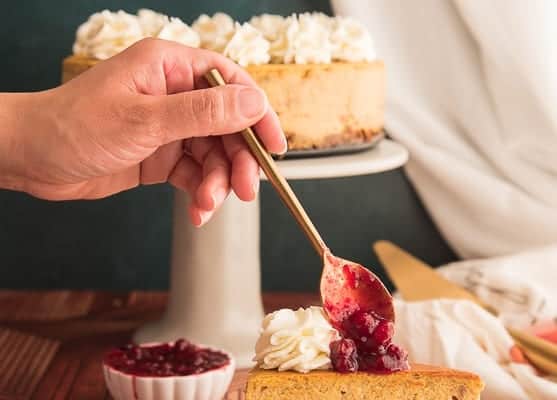
Garnish your chilled pumpkin cheesecake with rosettes of flavored whipped cream. Another great way to decorate your pumpkin cheesecake is with a generous spoonful of my Boozy Spiced Cranberry Sauce, a drizzle of Cajeta, or Spiced Toffee Sauce.
How Do I Serve Pumpkin Cheesecake?

Remove the springform collar from the cheesecake.
Slice the pumpkin cheesecake using a sharp knife dipped in hot water and shaken off to make the first cut. Re-dip the knife into the hot water, wipe it with a paper towel, and make another cut to create a slice. Dipping your knife in the water removes the excess cheesecake from the knife blade, giving you a clean slice of cheesecake.

Many people enjoy cheesecake with coffee, tea, or milk. Enjoy yours however you like.
How Do I Store Leftover Cheesecake?

Refrigerate pumpkin cheesecake until you’re ready to serve it. Store leftover pumpkin cheesecake, covered, in the refrigerator for up to 3 days after baking it.
Press a piece of plastic film or wax paper against the insides of a cut cheesecake to keep it from drying out in the refrigerator. Try to avoid keeping cheesecakes out at room temperature for extended periods. Because pumpkin cheesecake is a custard, it must be kept refrigerated to prevent foodborne illnesses.
Can You Freeze Pumpkin Cheesecake?

You can freeze cheesecake after you bake and cool it completely. To freeze pumpkin cheesecake:
- Carefully remove it from the springform pan and wrap it well in 2 layers of plastic wrap.
- Freeze the cheesecake for up to two months.
- Thaw the cheesecake in a refrigerator for 12 hours (or overnight) before serving.
You’ll undoubtedly be the dessert hero for bringing this Pumpkin Cheesecake with Gingersnap Crust to the dessert table this year. This creamy pumpkin dessert takes the flavor you love from the traditional pie and bakes it into a tart and sweet cheesecake. It’s like getting two amazing fall desserts in one bite.
Be sure to pin this pumpkin cheesecake recipe to your Thanksgiving or Holiday board and share it wit your friends and family.
Pumpkin Cheesecake with Gingersnap Crust
at Sense & EdibilityEquipment
- electric hand or stand mixer
Ingredients
For the Gingersnap Crust
- 2 cups (397 grams) gingersnap crumbs
- 6 tablespoons (85 grams) unsalted butter melted
For the Pumpkin Cheesecake
- 1/3 cup (40 grams) cornstarch
- 1 teaspoon (3 grams) ground cinnamon
- 3/4 teaspoon (3 grams) ground nutmeg
- 3/4 teaspoon (2 grams) ground ginger
- 1/2 teaspoon (1 gram) ground cloves
- 1/4 teaspoon ground allspice optional
- 1/2 teaspoon (3 grams) kosher salt
- 4 8 ounce packages (904 grams) cream cheese at room temperature
- 1 1/4 cups (250 grams) granulated sugar
- 1 tablespoon lemon zest (from 1 medium lemon)
- 2 teaspoons (10 grams) vanilla bean paste (or vanilla extract)
- 4 large eggs at room temperature
- 15 ounce can (428 grams) pumpkin puree
- 1/4 cup (60 milliliters) heavy cream
Optional Toppings
Maple Whipped Cream
- 1 cup (240 milliliters) heavy cream
- 1 tablespoon (16 grams) granulated sugar
- 1 teaspoon (5 milliliters) maple extract or cinnamon, hazelnut, rum, or vanilla extract
Instructions
- Preheat your oven to 350°F (177°C).
Prepare and Bake the Gingersnap Crust
- In a bowl, mix together the gingersnap cookie crumbs and melted butter.Squeeze the crumbs together in the palm of your hand to check that the mixture is the proper consistency. If the crust holds together in a firm clump, it's ready. Add 1 to 2 tablespoons of melted butter if it falls apart or 2 to 3 tablespoons more gingersnap crumbs to soak up the excess fat if it seeps butter.
- Use the bottom of a measuring cup to press the gingersnap crust mixture into a 9" springform pan.
- Bake the crust for 10 minutes in the preheated oven.Remove the baked crust from the oven to cool. Do not turn off the oven.Once it's cool, wrap the pan in two layers of heavy-duty aluminum foil, then set aside.
Prepare the Pumpkin Cheesecake batter
- Bring a pot of water (approximately 6 cups) to boil over medium while you prepare the cheesecake batter.
- Whisk together the ground cinnamon, ginger, nutmeg, cloves, allspice, salt, and cornstarch in a small bowl.Set this spice blend aside.
- In a 4-quart mixing bowl, blend the cream cheese, sugar, lemon zest, and vanilla bean paste on low speed, until smooth.
- Add the eggs- one at a time- to the bowl, making sure to scrape down the bowl after each egg is incorporated.After you've added all of the eggs, mix in the pumpkin and the heavy cream until blended.
- Finally, add the cornstarch-spice blend you mixed earlier.Blend just until the spices are incorporated. Be sure not to mix the batter too long after adding the cornstarch.
Bake the Pumpkin Cheesecake
- Scrape the prepared pumpkin cheesecake batter into the foil-wrapped cheesecake pan. Set the cheesecake pan into a larger pan that has at least two inches of clearance on the sides of the cheesecake pan.
- Carefully pour the boiling water into the larger outer pan. Be careful to avoid splashing water into the cheesecake batter.Place the pan setup into your the hot oven and bake the cheesecake for 1 hour and 15 minutes.
Gradually Cool the Pumpkin Cheesecake
- Once the baking time has elapsed, turn the oven off and prop open the oven door with a wooden spoon. Allow the cheesecake to cool slowly in the oven for 1 hour.
- After an hour, remove the cheesecake from the oven, then from the water bath. Remove and discard the protective foil and allow the pumpkin cheesecake to cool to room temperature on the countertop.Cover the pan with plastic film and refrigerate the cheesecake for 6 to 12 hours (or overnight).
Prepare the Maple Whipped Cream Topping
- A few hours prior to serving the pumpkin cheesecake, combine the heavy cream and maple extract in a mixing bowl. With your electric hand mixer on medium speed, whip the cream just until the beaters begin to leave ribbons in the cream.
- Start sprinkling in the sugar. After adding the sugar, increase the mixer's speed to high and whip for 2-3 more minutes, or until the cream is fluffy and stiff. Use a spoon or a piping bag to pipe rosettes of cream on to the cheesecake to create a whipped cream border.
- For added flavor, top the pumpkin cheesecake with my Boozy Spiced Cranberry Sauce.Store the pumpkin cheesecake in the refrigerator until ready to serve. Enjoy it within 72 hours after baking.
Notes
Swaps and Substitutions:
- You can use fresh pumpkin puree instead of canned. Just use the same amount.
- Replace the pumpkin puree with mashed sweet potato.
- Replace the ground cinnamon, ginger, nutmeg, cloves, and allspice with 3 1/4 teaspoons (9 grams) pumpkin spice blend or 2 teaspoons (6 grams) chai spice blend.
- Instead of gingersnap cookies for your cheesecake crust, use graham cracker crumbs, Biscoff cookie crumbs, vanilla or chocolate wafers, or animal crackers.
- You can replace the cornstarch with the same amount of all-purpose flour or leave it out altogether.
Tips and Techniques:
- Avoid over-mixing the batter after adding the cornstarch-spice blend as this will result in a gummy cheesecake.
- Try not to get any water in the cheesecake when making the water bath. This will prevent the custard from setting.
Storage Instructions:
- Store cheesecake, covered, in the refrigerator for up to 3 days after baking it.
- Press a piece of plastic film or wax paper against the insides of a cut cheesecake to keep it from drying out in the refrigerator.
- Avoid keeping cheesecakes out at room temperature for extended periods to prevent foodborne illnesses.
Freezing Instructions:
- Allow the pumpkin cheesecake to cool completely.
- Wrap in two layers of plastic wrap, then in one layer of heavy-duty aluminum foil.
- Freeze the cheesecake for up to 2 months. Thaw under refrigeration before serving.


I never made cheesecake before and I’m a terrible baker but this came out great! My boyfriend refused to let me take it to the holiday dinner because he didn’t want to share lmao
LOL! I read this comment to Hector and he’s all, “The boyfriend is my kind of guy!” That’s totally something that he would say. I’m so glad you found success with it!